Tuesday, March 15, 2011

Goat Cheese and Tomato Manicotti

Yes, you read this correctly. Those that saw Sunday's meal planning post, or have talked to me in the last week, may recall that I gave up pasta for lent, and pizza but that's irrelevant right now. No, I don't have anything against Italians, but thought this would be the best challenge for me since pasta seems to be my meatless go-to meal and pizza is Mr. Max's every suggestion when we don't have something to make. However, I had the ingredients to make this and decided to carry on and just do it. I thought Max Man can enjoy this one, while I made a pasta-free substitution with spaghetti squash for me. I've mentioned our caveman talk before, a series of food-induced grunts communicating our taste buds enjoyment with each other for the bite we just took. Well, it was a caveman talk night. He even enjoyed my spaghetti squash version that I had plenty of. I wish I could have tasted the final manicotti product but I'll take his word, err grunts, for it!

This came from, no other than my latest recipe source, Prevention Magazine's Best Weight Loss Recipes. Nutritional facts include 203 cal, 13g protein, 27g carb, 2g finer, 7g total fat per serving, serving size is 1 manicotti.

Grocery List:
  • 8 lasagna noodles (what the recipe calls for to serve 2-4. Since it was just for Max, I used 5 to allow room for mess up... luckily, you'll see why)
  • 1 1/2 cups low fat cottage cheese
  • 2 cloves garlic, minced
  • 1/4 cup julienned basil leaves
  • 1/4 tsp salt
  • 1/4 tsp black pepper
  • 1 can (15 oz) fire roasted tomatoes
  • 1/2 cup low-sodium chicken broth
  • 2 oz soft goat cheese
Go ahead and preheat your oven to 400 degrees. In a large pot of salted water, cook your noodles on high heat for about 11 minutes. The recipe said 6, mine were definitely not ready so I put them back in for another 5 minutes. Once done, drain the water and set the noodles spread apart on plates, so they are not touching.


In a bowl, whisk your cottage cheese, garlic, basil, salt and pepper together.


In a saucepan, combine your tomatoes (drained, I didn't drain them from the can and I think my sauce was too liquidy), chicken stock (or you could not drain them and skip this step instead), and 1/2 of your goat cheese. Bring this to a boil, stirring well for the goat cheese to melt and create a tomato/cheese cream sauce.


Coat a small oven safe dish with cooking spray. Spread 1/4 cup of your sauce across the bottom, like we do for enchiladas. Now we roll our manicotti. Spread about 2 spoons-worth of the cottage cheese mixture onto the bottom 1/3 of the noodle. Roll up your pasta and place seam side down in the dish.

This was my failed attempt when my noodles weren't ready


Let's try this again with the well-cooked noodle....


Now roll - much better....


Ta-da!


Squish them together nice and tight into the dish.


I was able to fit four together, which was perfect for Mr. Max. Then, I took spaghetti squash and piled it in the other side for me!


Coat with the rest of the pasta sauce, then top with the rest of the goat cheese.


Bake for about 20 minutes, until bubbling and cheese is beginning to brown.


Now, I don't like the way these pictured, but I was too hungry to turn it into a photo shoot for the best angle, lighting, etc. I don't like having to assure you that it tasted WAY better than these depict, but it's true. Like I said above, I think by using the tomatoes with the juices from the can AND the chicken stock was way too runny, I would drain or nix the chicken stock next time to prevent this. Without further adieu...

Here's the manicotti shot


Here's the spaghetti squash shot

Monday, March 14, 2011

Buttermilk Mashed Potatoes and Cauliflower

After some encouragement, I decided to give this mashed cauliflower thing another shot. To ease into it again, I found this recipe in a Cuisine Lite magazine. We use a little bit of potato, a little bit of cauliflower, some buttermilk, some chives, it's good stuff. I have to say, this was hard to differentiate from the all-potato version I typically make. This has our stamp of approval and tasted perfect with the roast. The nutritional facts include 135 calories, 6g total fat, 19g carbs, 3g protein and 39mg calcium per serving.

Grocery List:
  • 3 Yukon gold potatoes, peeled and cut into chunks
  • 2 cups cauliflower florets
  • 1 tsp. garlic salt
  • 1/3 cup buttermilk
  • 3 tbsp. unsalted butter
  • Chopped chives
Boil potatoes, cauliflower and garlic in a pot until tender when pierced, about 15-20 minutes. Drain and return vegetables to the pot. Add the butter, buttermilk, garlic salt and chopped chives.


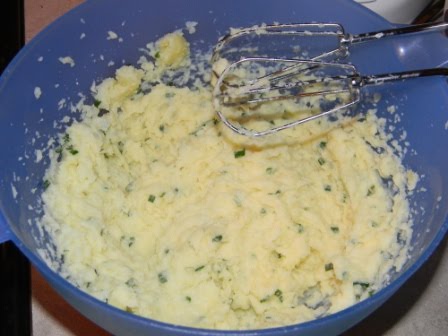
Using a hand mixer, beat on medium speed until smooth. Served with pot roast.

Better Than Yo Mamma's Pot Roast

When I think back to mom's dinners back in the day, her wonderful pot roast always comes to mind. Except, I'm not making my mom's version - I'm making Prevention Magazine's Best Weight Loss Recipes version. As we are ending our colder days in Dallas, I wanted to make this recipe before I put the crock pot away. It also worked perfectly because Mr. Max and I both had a meeting tonight that didn't put us home until after 8:00, so this was able to cook all day in my slow cooker and all I had to do was whip together the potatoes and cauliflower when I got home. This delicious dish lived up to the name, no offense to my mamma! Nutrition facts include 320 calories, 42g protein, 18g carbs, 2g fiber, 9g fat per serving.

Grocery List:
  • 1.5 lbs rump roast
  • 1 tbsp olive oil
  • 1 1/2 cups beef broth
  • 1 cup ketchup
  • 1/2 cup apple cider vinegar
  • 1 onion, chopped
  • 2 cloves garlic, minced
  • 4 tbsp. brown sugar
  • 3/4 cup baby carrots (I threw in half a bag)
  • 1/2 cup celery, chopped
Heat your oven to broil. Coat the roast in oil and set in an oven safe dish, broiling each side of the meat for 5 minutes to help brown it.


Combine the broth, ketchup, vinegar, onions, garlic and brown sugar in a 4-quart or large crock pot. Next add the roast, carrots and celery. Give it a stir and cover, cook for 6-8 hours.


After all of the time has lapsed, all you'll have to do was cut into it with a large spoon to serve. This was so juicy, sweet, savory, flavorful... it was a perfect roast, definitely living up to the name. I served with a much better attempt at cauliflower mashed potatoes!


Photobucket


Sunday, March 13, 2011

Gnocchi and Gnudi Cooking Class


Miss G and I recently bought Groupons and got into a Central Market Cooking class, Gnocchi and Gnudi this past Friday night. We had a blast learning how to make the delicious, pillowy potato and ricotta dumplings. On the menu for the night was Potato Gnocchi with tomatoes, basil and olives, semolina gnocchi with lamb ragu, herb gnocchi, sweet potato gnocchi with sage and prosciutto, and a ricotta gnudi with wild mushrooms and truffle sage.

This was the first time they taught the class so it was a learning experience for the chefs as well. Overall, both gnocchi and gnudi are rather difficult to make and very time consuming. I'm not sure if this is really something I'll be able to take away to make myself, hopefully at some point. In order to make them, I'll need to get a ricer as seen below to get the potatoes in prime form to make the gnocchi dough. This gets the potatoes into the size needed to blend with the other dough ingredients that you work into the dumplings.
Here are some pictures of our creations!

The delicious sweet potato gnocchi with fried sage and prosciutto, one of my favorites!

So good, this was the original potato gnocchi with tomato, basil and olives with Pecorino Romano, this was my absolute favorite.

Herbed gnocchi - we squeezed this out of an icing tube to give it this shape. Didn't care for this one as much, very doughy but it pictured well.

So glad these are not really pasta so that I didn't have to ruin lent so early on!

Ancho Adobo Steak with Whiskey Glaze

Holy moly, this was good. I found this fun little gem in a new Cuisine Lite magazine. Max Man and I have recently come to the conclusion that we just really like flank steak. I mean, it's just good people. A juicy, lean cut that because of its grooves and texture, it can really lock in and hold incredible flavors. We've loved the other flank steaks such as the Balsamic Flank Steak and the Vaquero Flank Steak, this one adds another great option to the flank steak resume. Delicious and nutritious, coming in at 290 calories, 10g total fat, 12g carbs, 32g protein and 22 mg calcium.

Grocery List:
  • 1/2 cup apricot preserves
  • 1/4 cup whiskey
  • 1/4 cup apple juice
  • 2 tbsp. minced chipotle chiles in adobo sauce
  • 2 tbsp. brown sugar
  • 1 tpsp. ancho chile powder
  • 1 tsp. kosher salt and black pepper
  • 1 1/2 lb. flank steak
If you have a grill, you can use that, I decided to stick to the griddle tonight. Preheat your grilling device and brush with vegetable oil.

Whisk together the preserves, whiskey, apple juice and chipotle peppers in a bowl. I read once in another recipe that called for whiskey, that you could use apple juice as a sub. Now, it's been quite the weekend. I opened my cabinet and saw the Crown whiskey that I inherited from a friend when they moved and didn't want to ship alcohol, totally understandable, happy to take on this burden :-) However, they moved in September and this is the first time I've used any of the stash I received. Meh. So, back to the weekend.... opening up that whiskey and getting a whiff made me want to double over, so I decided to half the original 1/2 cup the recipe called for and do part whiskey, part apple juice. You can choose to do all apple juice, all whiskey or combine the two. I liked the way this turned out.

Combine the brown sugar, chili powder, salt and pepper in a small bowl. Rub the mixture over both sides of the meat, along with any meat tenderizer, if you have it.


Grill your steak for about 3 minutes on the first side, flip to grill the other side for another 3 minutes. Brush your glaze on the exposed side of the meat, grilling for about 2 minutes more. The reason we glaze midway through the cooking is to allow the sauce to caramelize, rather than burn. Continue to cook, flipping as needed, applying glaze each time you flip.


When you think it is done, do the meat-cooking-rule-of-thumb I taught you in the first Central Market class post. Always cut flank steak thinly against the grain for the best results and taste. Served with chipotle-cheddar polenta, green bean and squash medley.

Chipotle-Cheddar Polenta

This was one of the recipes Mr. Max and I learned to make at our first Central Market cooking class, Texas Tastes. It was originally made with grits but polenta is such a close substitute, I thought I'd just swap it out to make it "our own". The recipe we took home from our class packet was for -12 servings so I just tried to wing it decreasing for a 2-4 serving.

Grocery List:
  • 3/4 cup polenta (or grits)
  • 1/2 - 3/4 cup cheddar cheese
  • 5 tbsp. butter (hold on hips, it'll be okay), softened
  • 2 slightly beaten eggs
  • 1/2 tsp. dry mustard
  • Worcestershire sauce to taste
  • 1 tbsp. chipotle adobo, pureed
  • Salt and pepper to taste
Go ahead and start by preheating your oven to 350 degrees. The directions said to cook the grits - or in our case, polenta - according to package. The problem being, my polenta was from the big, do-it-yourself canisters at Whole Foods, meaning no package. I found online that you cook 4 cups water to every 1 cup of polenta. Since I was doing 3/4 cup of polenta, I did four measured cups of 3/4 water, so simply 3 cups (I made that more difficult on myself than I needed to, but trying hard to be accurate). In a large pot, salt your water and bring it to a boil. Once boiling, slowly add the polenta, stirring so that it doesn't clump. It took about 8 minutes for the polenta to absorb the water on medium-high heat.

Check out this other fun toy I found at Central Market today too! It's a great little spoon rest, clips right on the side of your pot. Can't find this exact one, but you can find something very similar right here.


Next, add your butter and stir well. Turn the heat to low and add your mixed egg slowly, making sure the egg is stirred in before you add more. It's important to turn this down to low heat so that your egg doesn't cook or "scramble" in your polenta.

This is what the chiles in adobo looks like, found at Central Market.

I used my food processor to puree, then scooped out 1 tbsp worth and added to the polenta.

Stir in about 4 shakes worth of Worcestershire sauce and the dry mustard. Take a little taste and a deep breath as you enjoy it. Add a sprinkle of cayenne pepper if you want it to have more kick, but the Adobo chiles should have all the spice you need. Finally, add the cheese!

Grease a cast iron skillet - another new toy!! Pour the polenta mix into the skillet and stick it in the oven for about 35 minutes, until browned.

Served with ancho adobe flank steak and a green bean, squash, bell pepper medley.

Green Bean and Squash Medley

Delicious and nutritious little side dish we have here, and it is so very simple to make! We made a version like this at our Texas Tastes Central Market Cooking School, it was nice to recreate on our own.

Grocery List:
  • 1/4 pound fresh green beans, trimmed
  • 1 red bell pepper, julienned
  • 1 yellow squash, chopped
  • 1 zucchini, chopped
  • 1/2 tsp. olive oil
  • 1 tbsp. parsley
  • 1 clove garlic, minced
  • Salt and pepper to taste
Take your beautiful stoplight color veggies and throw them in a skillet with olive oil. Let cook and add green beans. I actually used some pre-cooked green beans we had left over from Eatzi's a few days ago, so just threw them in. Cook for about 10 minutes on medium heat, until all are soft.


Add the garlic, cooking until fragrant. Add a big pinch of parsley then season with salt and pepper to your liking!
check out this fun new toy! Great for getting things off your cutting board and into a pot, bowl, skillet, etc. Bought it at Central Market but you can find it here.


Served with chipotle cheddar polenta and ancho adobo flank steak.
Related Posts Plugin for WordPress, Blogger...

Print Friendly