Showing posts with label Low Stress - God Bless. Show all posts

Tuesday, May 21, 2013

Best Salad Dressing, Ever.

 https://blogger.googleusercontent.com/img/b/R29vZ2xl/AVvXsEiaKE08vHR1JKoreL18i2v2ebOfbwHY91wtG3IHlkr36HUNvGvrNJ_gbcNVQbN2hRKTYmxGX0NQegMjDP1VNcqgT5Lg-go30FuNbo2cXq8VWbPw1GmdUiQFcINOETs_1W1bBZYN92YfqkI/s320/Summer+cooking+451.JPG

I realize this title is a very bold claim. 

Let me rephrase this: if you like a hint of sweet and a punch of heat, if you are trying to get away from consuming fatty oils, if you are looking for a fat-free, sugar-free, practically carb-free salad dressing that you can make yourself... then yes, this is the best salad dressing ever

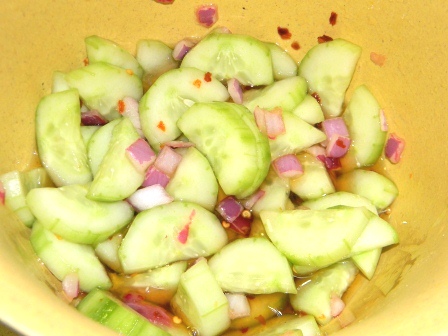
I came across the recipe last summer from Our Best Bites blog. It was a water-vinegar based marinade tossed with cucumbers, red pepper flakes and red onion. I made it as such, then put it on a bed of spinach leaves and paired it with simple chicken kabobs. It made for a wonderfully simple, delicious and nutritious dish!

Fast forward to now and I have my monthly girls-night-in cooking group. With swim suit season officially here, we decided to go with some light favorites with leafy greens and grilled lean proteins. I volunteered to contribute the salad and thought I would use this marinade as a salad dressing. Making a small edit to the original, I nixed the sugar and added a splash of red wine vinegar to the mix instead. Combining a plethora of baby greens, I added this cucumber and sweet/spicy "dressing" with avocado and feta cheese. We served it with chicken and shrimp skewers, the result was fantastic.

This week, I wanted to re-make that salad for Mr. Max in our weekly meal plan, but planned to take another past recipe that we loved and do a little recipe mash-up. For this dish I re-did the skinny Bangin' Good Shrimp originally acquired from Gina over at Skinnytaste. I made some very slight adjustments to her recipe the first time, mainly subbing the mayonnaise for Greek Yogurt to cut down on excess calories and fats, a wonderful result.

The two together were fantastic, it was perfect for a light week night meal, but definitely have a glass of water handy. The nutritional facts for the dressing alone can be found here; this is for a full 4 servings of the dressing, 1 serving would look more like this! The nutrition facts for the whole meal can be found here, both calculated by SparkRecipes.com.The meal combo is low in fat, calories, carbs, high in protein and fiber! Try this salad combo out, or make the dressing alone for your next summer salad and let me know how you like it!

Grocery List:
Recipe amount yields 3-4 servings

For Salad
*denotes ingredients used for dressing only
  • *1/4 cup rice wine vinegar
  • *1/4 cup water
  • *1 tbsp. red wine vinegar
  • *1/2 tsp. red pepper flakes
  • *1/4 cup red onion
  • 1 large cucumber, peeled, de-seeded, chopped (about 1.5 cups cucumber)
  • 3-4 cups mixed greens
  • 1 small avocado, chopped into small cubes
  • 1/4 cup feta cheese, crumbled
For Shrimp
  • 1/2 lb. cooked shrimp, tail removed
  • 2 tbsp. plain, non-fat Greek yogurt (I used Oikos)
  • 1 tbsp. green onion, diced (start chopping from white tips for most flavorful part of the bulb)
  • 1 tsp. Sriracha
  • 1 tsp. Sweet Red Chili Paste 
Start by making the dressing by combining all italicized ingredients into a small sauce pan, minus the red onion. Bring to a boil and allow to reduce by almost 1/3 cup. This allows the liquids to thicken slightly and become a little more syrupy.

https://blogger.googleusercontent.com/img/b/R29vZ2xl/AVvXsEi5YE3hxg_0d4PUE6cAGIE4_Bq4WL52cG7NMNEGvdy_BVDzQLbCLhvXy42u4crlyBy4F1ndDd225QIMxzzKmnzoK0_t47SET0mUUBprCWx6Kc3fdnB1741Aud1G4jhd6UQkCN4DwEw0bzM/s320/Summer+cooking+448.JPG

Once reduced, take off the heat and add the red onions. This time around, because I was adding a shrimp with some spice to them, I drained the liquid and discarded of the chili pepper flakes and seeds before adding the red onion. Let sit and cool for about 15 minutes or until room temperature.

https://blogger.googleusercontent.com/img/b/R29vZ2xl/AVvXsEgP4LnuvDXF9ofsTmOuGPEX5eBNx81-SNujZH3vTyW5tJBiUiPkbdr0nd1MlGb0SpdOpWXwgZwjZ_Wt6ftGkZL4eJx3VQByw6t6pVuO6frgZuukLfSlRWDmYyv2fJMV7ENQnQ62pGwIcEM/s320/Summer+cooking+449.JPG 

I chose to get already cooked shrimp on this grocery run. Okay, maybe it was not a cognitive decision, it was done on accident, but it worked to my benefit. It decreased the time to prep the meal, which is always nice! I simply took the cooked shrimp, removed the tails and combined them with the mixture of the greek yogurt, green onions, sriracha and sweet red chili sauce. 

https://blogger.googleusercontent.com/img/b/R29vZ2xl/AVvXsEi0VAr0G0h8FeWDKp7qLvJ9XrFdgW51wo4hplcQTPpzIWz2XCKP7SVVe5w2VyH51kcQIcAEXcIIhGqQU_hodk7ZckOHSP1c6yOMwcGoGwXXlPEzEn7gH3fLUIMVMT5ah7rMCPBzyacRX94/s400/march+2013+011.JPG 

I decided to heat this in the microwave for a mere 30 seconds to warm up the already cooked shrimp just a tad.  Adding the lettuce, feta, cucumber and avocado to the bowl, I poured in the dressing and mixed the contents well. Plated the result and topped with the shrimp (5 for me, 7-8 for Mr. Max). 


Thursday, April 4, 2013

Quinoa Pasta with Spinach-Avocado "Pesto"


Have you heard of quinoa pasta?!? If not, then let me tell you a story.

In January, I was sitting at a brunch with new people after we all just finished a yoga class. One of the girls was talking about this pasta and I found myself very intrigued! After nearly 30 minutes of talking about that, kale smoothies, kombucha drinks and yoga inversions, we realized we had just made perfect sound bytes for a Sh*t Yogis Say video parody. While I do not fancy myself as "a yogi" I did have to agree that just happened and we sounded ridiculous. But I learned about a fantastic little secret nugget and I couldn't wait to try it for myself!


The next day when Mr. Max and I were doing our weekly grocery shopping, I decided to find it and put it on the meal plan for the week. Since then, we have made it probably a dozen times and let me tell you, this stuff is legit! It tastes like any other given pasta but it contains less fat and much higher in fiber and protein than even whole wheat/grain pasta. You can find it in any grocery store, it is located with the gluten-free and special dietary needs. My one complaint? They don't have a penne version.

Now, onto sharing a recipe for it. I've made a few that are noteworthy and ones I do plan to share, I thought I'd start with this one. It's like, a super food party on a plate. You've got avocado, spinach, and a quinoa based pasta; pair that with a nice, lean protein and that's a delicious and nutritious dish my friends. Okay, I guess I have one more complaint, but that's all, I promise. I do feel the need to provide warning that this cooks much faster than regular pasta, especially the smaller shapes. Pay attention to it and don't let it overcook because it will get mushy.

Nutritional facts were calculated at SparkRecipes.com and can be found here (includes 4 oz. grilled chicken breast). 

Grocery List:
Recipe Yields 4 servings
  • 1 ripe avocado, cut in cubes
  • 1 cup spinach
  • 1 tsp. + 3 tbsp. olive oil
  • 2 tbsp. fresh lemon juice
  • 3 cloves garlic
  • 1 box of Ancient Grains spiral quinoa pasta 
To start, take a pot and will with water. The box tells you to use 4 QUARTS of water, but that is just wasteful when 1 quart (4 cups) of water is more than enough. Add just a little olive oil (about 1 tsp.) into the water to keep the noodles from sticking together. Bring the water to a boil and add the pasta, turning down the heat on the stove to about medium-low. Watch it closely, it will cook in about 4-6 minutes depending on the size and shape. Once al dente, drain and set aside in a bowl.

In a food processor, take the avocado cubes, add spinach, olive oil (3 tbsp.) and garlic cloves. Process until creamy and smooth. If it is too thick for your liking, you can think out with additional olive oil.

Toss the "pesto" with the pasta and serve! It is great on its own or pairs wonderfully with a simple grilled herb chicken breast.


Tastefully yours,


Thursday, March 7, 2013

Butternut Squash and Kale Hash


This was the meal that brought me out of my blog sabbatical because I just had to share! One of the fun things about cooking is after you do it long enough, you start to just know how certain tastes are going to meld and blend together. I love how you know you can combine the savory of Worcestershire, tang of champagne vinegar, sweet of agave and the piquant of dijon mustard to create an incredibly tasty glaze, and know that it will all work together. When you can look around your pantry or fridge, then just start mixing, that is when magic happens. And friends, that is the most fun part to reach in your kitchen adventures! 

This meal was inspired by a pinterest post for a sweet potato and kale hash, it was a breakfast dish with a fried egg on top. I have nothing against sweet potatoes, but I do have a love a-ffair with butternut squash so I decided to swap one orange veggie for another, just the way I like it. Mr. Max has been on a big kale kick ever since we did a cooking class in January with a crispy kale dish. I wanted to be able to take his new favorite veggie with my favorite veggie, then add some other stuff and make it a meal. Sounds pretty technical, huh?

I was shooting from the hip with this dish but wrote it down as I went a long so I could remember and hopefully get around to posting.... ta-da! I actually did this time. Nutritional fact breakdown can be found here, calculated at SparkRecipes.com.

Grocery List:
Yields 4 servings
  • 10 large Kale leaves, de-stemmed and chopped into large chunks (we operate by, the darker the better! Grab some dino kale to try it out)
  • 1.5 - 2 cups Butternut squash, cubed
  • 3 tbsp. olive oil, divided
  • 1 shallot, minced (about 2 tbsp. worth)
  • 3 cloves garlic, minded
  • 1 tsp. red pepper flakes
  • 1/2 tsp. rosemary
  • 1/4 tsp. cumin
  • 1/4 tsp. chili powder
  • 2 tbsp. shredded Parmigiano Reggiano (approximately)
Start by pre-heating your oven to 450 degrees to roast your butternut squash cubes. Toss with 1 tbsp. of olive oil to coat then sprinkle with the red pepper flakes and rosemary.  Set on a baking sheet lined with aluminum foil (easy clean up process and assists in the crisping), then pop in the oven to roast for 20 minutes. We want these babies to have some brown on them, some color.

When you have about 10 minutes left on the timer for the roasting squash, take 1 tbsp of olive oil and begin to saute your shallots in a large saute pan over medium heat. Once frangrant, add the garlic and saute for about 3 minutes.

Add the kale and the final tbsp of olive oil, tossing in the pan to coat, which will help it cook and crisp. Let it sit for about 2 minutes on medium heat, then move it around the pan again. Right about now, the squash should be ready to take out of the oven. Add it to the pan and combine the two, adding the cumin and chili powder. Turn up the heat to about medium-high (6 or 7 on the dial) and let that kale crisp a little more in all the flavors.

Finally, you will add two large pinches of Parmigiano Reggiano. Give it a stir, fold it together, do what feels right.

Dish it out and serve for a deliciously nutritious, easy weeknight meal!

Served with petite Pork Tenderloin Medallions in a Cider-Dijon glaze
Directions:
Slice a pork tenderloin into 1 inch discs. In a small skillet, mist with cooking oil and set 4-5 slices, not touching one another, on the hot surface. Cover with a lid and let cook for 2-3 minutes on medium-high heat, then flip and cook for another 1-2 minutes. Both sides should have a nice brown marks, medium heat should register to 145 degrees.

As the medallions cook, time to whip up an easy glaze. I combined some of my favorite tastes mentioned in the opening paragraph: 2 tbsp. Dijon mustard, 1.5 tbsp. Worcestershire, 1 cup apple cider, 1 tbsp. champagne vinegar, 1 tbsp. agave nectar, 1 tsp. shallots, 1 tsp. rosemary. Place all of this in a sauce pan over medium heat, when it begins to simmer, bring the heat down to low to allow it to thicken, about 10 minutes total. To serve, spoon over top pork medallions. 

Nutritional fact breakdown for pork and sauce can be found here, calculated at SparkRecipes.com.  
One serving yields four small or three large medallions and 1 tbsp. of sauce. 


Tastefully yours, 


Wednesday, October 10, 2012

Barbecue Pot Roast


This is a recipe that I can't wait to share! When you have something that you just loved to make and eat, it's really fun to run and tell everyone about it in hopes that they can then enjoy it like you did. Mr. Max and I have simply not been very creative with meals lately. We've had a lot of repeats or easy meals like salads, or simple fish and chicken breasts with roasted veggies. Blame that partially on a whirlwind event schedule and needing the ease, and maybe partially on trying to eat very basic because of the wedding that is approaching.

I can't say that I've been a dieting bride necessarily. I know how to eat well and I know what's good and what is not so good for me. I've just become a little more diligent on those what's good with more veggies and protein, and really strict on the consumption of the not so good like unneeded sugars, excess carbs or salty foods.

Well.... all that is fine and great but sometimes you just need some comfort food! Feeling slightly under the weather and having just one of those weeks, I decided that a pot roast seemed appropriate because it gave me a perfect reason to make a cauliflower and potato puree - mmm potatoes! Pinspired by the fabulous Plain Chicken blog, I used this for reference but made my own version based on what I had in the fridge.

Nutritional facts can be found here, and they were surprisingly not as bad as I thought; this is 8 WW points per serving.

Grocery List:
Recipe yields six servings
  • 2 lb rump roast, trimmed (rump is leaner than chuck roast)
  • Garlic salt to taste
  • Pepper to taste
  • 1 cup chili sauce
  • 1/4 cup apple cider vinegar
  • 2 tbsp. BBQ sauce (I used our favorite, Austin's Own, Medium Heat)
  • 2 tbsp. Worcestershire sauce
  • 1 tbsp. Sriracha
  • 2 cups carrots
  • 1 cup celery (optional)
  • 1/2 cup water (optional)
To start, sprinkle your roast with the garlic salt and pepper, then place in the crock pot. Surround with the celery, then the carrots. I thought I got most of what Plain Chicken used but come to find, I did not. I didn't have a Coke, and didn't want to use one, so I subbed the taste of apple cider vinegar for a little bit of tang and to help compensate for the missing liquid. I decided to start with just 1/4 cup so that it didn't over power and could somewhat keep sugars low, and that amount was perfect. In a bowl, mix the chili sauce, apple cider vinegar, BBQ sauce, Worcestershire and sriracha together until blended. At this point, I looked at it and thought I needed to "water" it up more so that is when I added the water.
 

Once mixed, pour the sauce over the contents in the crock pot, put the top on and walk away. If you are cooking for over 6 hours, cook on low-medium heat. If you are cooking for under 6 hours, cook on high heat.

When you come back, test the roast to see if it falls apart at the touch and move the contents around to get everything a little saucy.

When the roast is ready, scoop the meat and veggies into a bowl, top with some extra sauce and serve! 
 Served with cauliflower-potato mash

Kate's Easy Cauliflower-Potato Mash
Boil 1 large Yukon gold potato, cut in on inch cubes 
and 2 cups of cauliflower florets.
When soft, drain and add 1/4 cup plain greek yogurt,
with 1 tsp. garlic powder and 1 tsp. butter.
Use electric beaters to mash until smooth and creamy
Serves 3-4


Tastefully yours,

Friday, August 24, 2012

Make a Meal: Soy-Mustard Glazed Salmon with Bok Choy Fried Rice


This dish happened in one of my favorite ways: by accident. I had fully intended to do a different salmon dish based off a recent menu sampling for wedding food. I had sent our chef some of our recipes for the dinner portion but we were having a hard time narrowing down the passed appetizer options that both matched our dinner "theme" and were easy enough to eat. One of the choices he served was a jumbo bacon-wrapped shrimp with a dipping sauce. It was like a barbecue/poblano chutney; there was a sweet tang to it and a subtle smokey heat. We nixed it for an app because it was too high maintenance to consume, not a good finger food, but we just loved the sauce. He told me that since I shared my recipes with him, he would return the favor. He came back with a printed copy of his recipe and I was ready to use it!

I was all set for that until I left my wedding binder (with recipe tucked in the pocket) at work. Arriving home and realizing that, meant I had to come up with another plan.

Enter the Soy-Mustard Glaze Salmon. First of all, I don't really like anything that has mustard in the title. I can do mustard when it is a simple ingredient, an undertone of a recipe, but not as a prominent feature. However, I found this in America's Test Kitchen Light and Healthy 2012 when I was making the Miso-Orange Glazed Fish. I remember this second glaze recipe and decided to try that, since I had all the ingredients on-hand already.

Now let's discuss the bok choy fried rice. My friend Greer had recently asked me how to make bok choy so I had it on my mind. I got brown rice, some chopped carrots for another meal in the week and the bok choy. Max Man was ready to help so I asked him to chop the bok choy to fit the saute pan. I meant in half but didn't articulate that, and sweet man chopped it like lettuce for a salad. As I prepared it, I started to think through how I would pull this off, because it was shrinking like spinach. I looked at the finished brown rice and decided to dump that in the skillet with the bok choy and add the carrots along with other tasty ingredients. Yes, I liked where this was heading.

Nutritional facts for the salmon are located here; 6 WW points per 4 oz. salmon filet. Nutritional facts for the stir-fry are located here; 2 points for 1/2 cup serving of the rice.

Grocery List:
For Salmon - Recipe yields two servings
  • 2 salmon fillets (4-6 oz. each)
  • 2 tbsp. light brown sugar
  • 2 tbsp. tamari (organic, low-sodium soy sauce)
  • 2 tbsp. mirin
  • 1 tbsp. sherry vinegar
  • 1 tbsp. whole-grain mustard
  • 1 tbsp. water
  • 1 tsp. cornstarch
  • 1/4 tsp. red pepper flakes
For Bok Choy Stir Fry - Recipe yields 4 servings
  • 1 cup brown rice 
  • 2 cups bok choy, chopped
  • 2 cloves garlic, minced
  • 1 tsp. sesame oil
  • 1 cup carrots, diced 
  • 2 tbsp. low sodium stir-fry sauce 
To begin, let your grilling surface start warming up (if you decide to grill) or heat your oven at 350 degrees. Next, cook the rice according to the package. As the rice cooks, begin your salmon glaze by placing the brown sugar, tamari, mirin, sherry vinegar, mustard, water, corn starch and red pepper flakes into a shallow sauce pan. Let simmer on medium heat and thicken for 5-7 minutes, whisking well.

As your glaze perfects, pan sear the salmon. When you flip the salmon skin down, you are allowing the omegas to permeate down through the rest of the fish, fully getting those vitamins. Thank you Central Market man for enlightening me on that little brain nugget.
 

Once salmon fillets are seared on both sides, prep your cooking method. I use a grill basket and cover with aluminum foil, then place the salmon down. Lather the glaze on the tops of the fish and set on the grill for 15 minutes. 

Oh hey, chopped bok choy!

In a large skillet or chef's pan, let your bok choy begin to wilt with just a splash of oil and garlic. When wilted, add the rice and carrots. Add stir-fry sauce and mix well on medium heat for 5 minutes.

Once the salmon flakes at touch and is a light pink, dish out the stir-fry and top with the fish. Enjoy this taste foodie friends. I'm actually about to make this salmon again. For the fourth time this month but new side dish! 


Tastefully yours, 

Friday, July 20, 2012

Make a Meal: Grilled Chicken Kabobs with Sweet and Spicy Cucumber Salad


While I was on the same grocery trip that inspired the Apple Banana Muffins, I also grabbed a recipe card for grilled chicken with cucumber relish while at the meat counter. It sounded light and refreshing for a summer evening so it made it home with me. Like kismet, the next day I stumbled upon another cucumber recipe on pinterest and decided to grab inspiration from each, adapting and combining the two for this dish. The chicken kabobs were easy, the cucumbers were easy, what more can you want in a week night meal? Health and nutrition? You are in luck, because this dish has that too.

I loved the sweetness and kick of heat to the cucumber salad. It was a tasty contrast and something that would work great on its own at a BBQ, a shower or like this for dinner.

Click here for the nutritional facts calculated at SparkRecipes.com and 6 WW points for one serving.

Grocery List:
Recipe yields 4 servings

For Chicken

  • 1 lb chicken, cubed
  • 4 cloves garlic, minced
  • 3 tbsp. Worcestershire sauce
For Cucumber Salad
  • 1 cucumber, peeled and quartered
  • Salt
  • 1/4 cup Mirin (rice wine vinegar)
  • 1/4 cup water
  • 1 tsp. crushed red pepper flakes 
  • 1 tsp. sugar
  • 2 tbsp. red onion, minced
  • 3 tbsp. feta cheese, crumbled
  • Baby spinach (optional for salad greens)

To begin, heat your grilling surface and brush with oil to help prevent the kabobs from sticking. Next, take your cucumbers and set in a colander. This next step I learned from the original recipe, it's very important to season with salt to help dry out the fruit. Otherwise, they will water down the final product. Salt and let sit for about 15 minutes, then pat dry with paper towels.
 

In a mixing bowl, combine the cubed chicken with the minced garlic and Worcestershire sauce. Let marinate for about 10 minutes and then thread bamboo or metal kabobs with about 5-6 pieces of chicken, resulting in about 4 oz. on each kabob.
 

While the chicken is marinating and the cucumbers are "salting," you multitask and move on to the cucumber salad sauce. In a small sauce pan, heat the mirin, water, sugar and red pepper flakes over medium high. Whisk together and let reduce to about 1/3 cup, about 10 minutes.
 

Once reduced, set to the side, add the red onion and let cool to room temperature.
 

Toss with cucumbers and add feta cheese, then place in fridge to serve chilled.
   

Grill the chicken kabobs, about 6 minutes on each side.
 

Once done, bring inside and assemble your plate. We used a bed of spinach leaves to enhance the green factor and add nutrients to the dinner. Spoon the cucumber salad atop the spinach and grab a kabob, dinner is served my friends!


Tastefully yours,


Asian Veggie and Chicken Wrap


I told you we've been on a wrap kick lately! Following the salmon and veggie stir fry dinner, I had about half a box of left over veggie strips from the produce area of Whole Foods. I used half of them for dinner and decided to prepare and use the rest for lunches during the week. I was able to simply saute in just a pinch of olive oil and then pair with shredded rotisserie chicken. Equipped with whole grain lavash bread and baby spinach, I quickly assembled an easy and healthy lunch! To decrease the sodium levels, I sauteed these veggies plain, using only the stir fry sauce to add a little flavor in the end.

The benefits to using a whole grain lavash bread over a tortilla or pita is that it has less carbs, no cholesterol and lavash is higher in protein and fiber.

Nutritional facts can be found here, calculated at SparkRecipes.com; one serving of this lunch is 6 WW points.

Grocery List:
Recipe yields 1 serving
  • 1 whole wheat lavash 
  • 1 cup baby spinach leaves
  • 1/2 cup sauteed vegetable strips (bell peppers, squash, zucchini, carrots, red onions)
  • 1/4 cup shredded chicken
  • 1 tsp. stir fry sauce 

Just like with the Chicken Caprese Wrap and the Mexi-Texi Wrap we will want to leave about an inch from both ends and begin to layer the filling 2 inches into the wrap. Layer the lavash as follows: spinach, veggies, chicken. Take the stir fry sauce and drizzle a light layer across the top.
 

To wrap, fold the ends inward and try to tightly roll, starting with the end where the filling is. Set seam side down. Cut in half on a diagonal bias and enjoy!


Tastefully yours,


Thursday, July 19, 2012

Grilled Teriyaki Salmon and Veggie Stir Fry


This is an easy two part meal that is both delicious and nutritious! I had started to make a Teriyaki sauce from one of my first posts but right before I placed the salmon into the marinade, I remembered I hadn't tasted it yet. I'm glad I did because something in the ingredients was not good. There was a rancid taste to it so I threw out some things that may have been past their shelf life, oops! Lesson to why you always taste test in the cooking process...and clean out your pantries every few months.

I had used the last of my soy sauce with the bad batch, and threw out my rice wine vinegar and apple cider vinegar. I paced between my pantry and fridge to come up with an alternative and decided to combine ponzu, honey and hoisin, add some sriracha and call it a marinade. Stuck my finger in that bowl, that was a good taste, we can move forward with this goodness.

Nutritional facts can be found here, calculated at SparkRecipes.com; one serving of this whole meal is 10 WW points.

Grocery List:
Recipe yields two servings
  • Two 4-6 oz. salmon fillets
  • 2 tbsp. low sodium Ponzu sauce (a citrus soy sauce)
  • 1 tbsp. Hoisin
  • 2 tsp. Sriracha
  • 1 tbsp. Honey
  • 1 tsp. Ginger
  • 1 tsp. Olive oil
  • 1 cup mixed vegetables, julienned or chopped (squash, zucchini, bell pepper, carrot)
Start by whisking together the ponzu, hoisin, sriracha, honey and ginger. Make sure that it tastes to your liking and you don't want to add anything!
 

Reserve about 3 tbsp. of it and then use the remaining to marinate your salmon, skin up, in a bowl at room temperature. Let this soak for about 20 minutes.
 

In the meantime, heat your grilling surface. We decided to use the grill, but if you are looking for less complicated cooking methods, you can pan sear or griddle the fillets as well. For the E-Grill, we used a grill pan, covered with foil and coated with non-stick spray. Place your fish on the heat and cook covered for 15-18 minutes.
 

For the veggies, I grabbed a pre-chopped box labeled as an Asian stir-fry in the produce section at Whole Foods. With strips of red onion, yellow squash, zucchini, red bell pepper, yellow bell pepper and carrot, it was perfect for this dish. The veggies were fresh and helped me cut down on at least 15 minutes of chopping. When the fish goes on the grill, it is veggie time. Heat the oil in a skillet over medium and add your veggies. Take the reserved teriyaki sauce and cook into the veggies for about 8-10 minutes on medium heat, until softened.
 

When salmon flakes to the touch and a nice light pink color, it is ready.
 

Pile your stir fry veggies on a plate, top with the salmon and dinner is served!


Tastefully yours,


Thursday, July 12, 2012

Chicken Caprese Wrap


Mr. Max and I have been on a wrap kick lately, this kind of lighter meal is just perfect for the summer. At our weekly grocery trip routine, I grabbed a package of lavash bread and set out to make daily wraps for the week, with this one loosely based on the beloved Caprese salad. I love to get a whole rotisserie chicken and shred it on Sunday, using the shreds for wraps and salads all week. Instead of basil, I used spinach leaves to add the green also giving it a more nutritious and full base. Does anyone else ever have the problem when you bite into a sandwich or wrap and the whole tomato slice slides out with that one bite? This is why I chop the tomato up into small bite-size chunks to avert that issue. Lunch or dinner, this dish is a winner :-)

Nutritional facts can be found here; one wrap is 7 WW points. If the chicken is already shredded, this takes all of 8 minutes to make.

Grocery List:
Recipe yields 1 wrap
  • 1 piece lavash or whole wheat tortilla
  • 1/2 cup fresh baby spinach leaves
  • 1/4 cup chicken, shredded
  • 1-2 tbsp. part-skim mozzarella cheese (depends how much cheese you want to add)
  • 2 tbsp. tomato, diced
  • 2 tsp. olive oil
  • 1 tsp. balsamic vinegar
  • Italian seasoning
  • Balsamic glaze or vinegar
Take your tomatoes and let them soak in the olive oil and balsamic vinegar. Sprinkle with some Italian seasoning and let sit for 5 minutes to really absorb the flavor.

For the best wrap technique, leave about an inch from both ends and begin to layer the filling 2 inches into the wrap. Layer the lavash as follows: spinach, tomatoes, chicken, cheese. Take the balsamic glaze and drizzle a light layer across the top. To wrap, fold the ends inward and try to tightly roll, starting with the end where the filling is. Set seam side down. Cut in half on a diagonal bias and enjoy!


Tastefully yours,

Related Posts Plugin for WordPress, Blogger...

Print Friendly