Thursday, October 20, 2011

Cranberry Couscous


I came across this recipe on another blog site and have had it stowed away for a night when I wanted to make a repeat entree, but experiment with a new side. This dish was quick and simple to make on a busy night, taking only 15 minutes and without many steps. The dried cranberries and almonds give a "fall-ish" taste that we loved! While making it, I thought about trying it again with diced butternut squash to really amp it up. You can substitute the couscous for other grains such as whole grain rice for more of a pilaf, an orzo or quinoa depending on your preference.

Grocery List:
  • 1 cup plain couscous (I used pearled)
  • 1/2 cup dried cranberries
  • 1/2 cup chopped sweet yellow pepper
  • 1/2 cup slivered almonds, toasted
  • 2 tbsp. cup lemon juice
  • 2 tbsp. cup olive oil
  • 1/2 teaspoon smoked paprika
  • Salt and pepper to taste
Cook the couscous according to the package.


Next combine your "dry ingredients", consisting of the cranberries, bell pepper, almonds and paprika.

  
Add in your couscous, followed by your olive oil and lemon juice, tossing together gently. Season with salt and pepper to taste.
 
This dish can be served warm or chilled and is a great compliment to a chicken or turkey dinner!
Served with goat cheese chicken tenders and green beans in a light balsamic glaze. 


Monday, October 10, 2011

Goat Cheese Chicken Tenders


This recipe was an improvisation based on what one may call an "oopsie" - sometimes mistakes can be so delicious. I had it planned to make a cranberry couscous and serve with our favorite goat cheese stuffed chicken that I hadn't made in a while. However, the chicken I bought last week had gone bad but I had not realized this until I was already home from the store and had started the other parts of dinner. With Mr. Max on his way over, a simple call and he was re-directed to the store to pick up chicken cutlets.

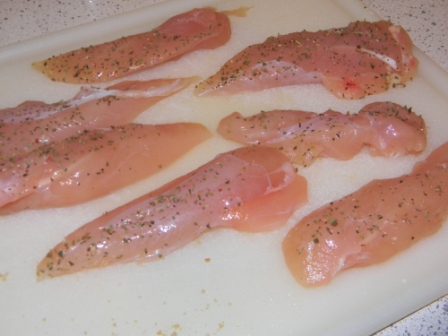
Alas, sweet Mr. Max thought chicken cutlets were the same chicken tenders so instead of ending up with butterflied chicken to work with, I had eight strips of chicken. And we laughed. While I cringed inside. My Type-A mood left me once the right-brain started to pump a little creativity into the situation. I took a look at what I had and decided I could jazz up these chicken tenders with ingredients I had already planned to use, as well as a few things from the pantry.

Grocery List:
  • 1 lb. chicken tenders (about 8 strips)
  • Choice of herbs (I used Herbs de Provence)
  • 4 oz. herbed goat cheese
  • 1 cup whole wheat bread crumbs
  • Balsamic glaze (bottled and stored on the same aisle as oils and vinegars)
Start by pre-heating your oven to 400 degrees and spray a casserole dish with non-stick cooking spray. Sprinkle the tenders with your herbs of choice and then using a knife, spread your goat cheese over the top of the chicken tender.

Pour the breadcrumbs into a large bowl then gently coat your chicken tender on each side.

Place in a baking dish and repeat until all tenders are finished.

Bake on 400 degrees for 12 minutes, then turn on the broiler for 3-5 minutes, until breadcrumbs are browned and the goat cheese is bubbling.

Remove from oven and drizzle with a balsamic glaze to complete the dish!
Served with cranberry couscous and haricot verts


Wednesday, October 5, 2011

No Pasta Lasagna


There are times that you really need a good pasta dish using penne or gemelli noodles that lock in the sauce and taste so good, but then there are other times that spaghetti squash can be a more than perfect star of any intended pasta meal. I recently saw this post from Skinnytaste and really wanted to try her version of a lasagna without noodles. My girlfriends and I have our next cooking night coming up and we are planning to create a "filling buffet" for individual lasanga dishes, personally tailored to all of our unique tastes. This is a version I was looking at and I thought I would test out before then.

I took Gina's version and adapted it just a bit, making my own tomato sauce and adding spinach. If you have a jarred sauce favorite, this will be even easier to make. Though if you have an additional five minutes to spare, I've included a quick and easy tomato sauce for you to whip up. I used a small baking dish, perfect for two servings or four smaller "side dish" servings.

Grocery List:
  • Spaghetti squash, roasted, halved and "stranded" (the act of combing out the strands with a fork!)
  • 1 can tomato sauce
  • 1 tsp. olive oil
  • 2-3 cloves garlic, minced
  • 1/4-ish cup of onions (optional depending on your tastes, onion powder could also be a good substitute if you don't like consuming them but want the flavor they can bring)
  • Salt and pepper to taste
  • 1 tbsp. fresh basil
  • Parsley and Oregano to taste (I would guestimate using at least 1/4 tsp. of each)
  • 3-4 dollops of Ricotta cheese
  • 3 pinches of mozzarella (roughly 1/4 cup)
  • Parmigiano Reggiano
  • Fresh baby spinach leaves, diced
First thing first, make sure you get your spaghetti squash prepped - that is the longest part of the process, though it is maybe 15 minutes tops. You can do this in the oven or speed it up in the microwave. Click here for directions for help. 

For the sauce, in a small sauce pan, add the olive oil and saute your onions until translucent, then add the garlic and cook on a low-medium heat until nice and fragrant.

Add the tomato sauce, stirring in the basil, salt and pepper, parsley and oregano. If you want to thicken your sauce, you can always add a little tomato paste but I didn't have any on hand.

Taking a baker, pour about 1/4 cups worth of your sauce on the bottom, add the strands from 1/2 of the spaghetti squash.

Top with ricotta, then spinach...

...mozzarella and the parm.

Bake at 375 degrees for 15 minutes and serve with a nice big salad. This was a great pasta alternative that won't disappoint!


Monday, October 3, 2011

Make a Meal: Cider-Glazed Chicken with Browned Butter Pecan Rice


Fall busy season is upon us and fast dinner fixes are needed. I had a late night at the office and simply refused to cave to hunger by going to pick something up, I needed a meal that I could eat guilt-free. Sound familiar? Do yourself a favor and scroll that mouse up to the top left corner to File, hit Print. Even the grocery store run was quick and easy for this one!

Dish contains 330 calories, 13g fat, 28g protein, 24g carb, 1.9g fiber, 81mg cholesterol, 1.5mg iron, 23mg calcium. Serving size is one chicken half and 1/2 cup rice. 

Grocery List:
  • 1 cup brown rice
  • 2 tbsp butter, divided
  • 2 chicken breasts, filleted in half
  • 3/4 tsp. salt, divided
  • 1/4 tsp. ground black pepper
  • 1/2 cup refridgerated apple cider
  • 1 tsp. Dijon mustard
  • 1/4 cup chopped pecans
  • 2 tbsp. flat-leaf parsley, chopped
Cook rice in a small sauce pan according to package. While rice cooks, melt 1 tsp. butter in a large heavy skillet over medium-high heat. Sprinkle chicken with 1/4 tsp. salt and pepper. Add chicken to pan and cook for 3 minutes on each side or until done, then remove. I cut each chicken breast in half for a total of four halves.

Add cider and mustard to pan, scraping the bottom to loosen brown bits from the chicken. Cook for 2-3 minutes or until it begins to become syrupy.

Add chicken to pan, turning to coat then remove from heat and set aside. Pour the additional cider sauce into a bowl to reserve for serving.

Melt remaining butter in saucepan over medium-high heat and cook for two minutes until browned and fragrant.

Lower heat to medium and add the chopped pecans, cook for 1 minute or until toasted, stirring frequently.

Add rice and the remaining 1/2 tsp. salt then toss well to coat.

Place the chicken over a bed of rice, drizzle a bit of the remaining cider, sprinkle with parsley and serve!

Wednesday, September 21, 2011

Caramel Banana Pudding

 Yes, please.

In the Chevy BBQ Hunt post from June, we sampled an incredible banana pudding dessert at the final restaurant destination, Smoke. When I was searching through Gojee.com for my dinner night-in with Sarah, I saw this and was immediately taken back to the blissful bites of that velvety banana pudding, laced with caramel. All the signs pointed to "duh" so the dessert was an easy decision. Here is the final installment of our night!

Grocery List:
For Pudding
  • 3 ripe bananas
  • 2 tbsp. unsalted butter
  • 1/4 cup brown sugar, tightly packed
  • 2 1/2 cup milk (we used skim, recipe suggested whole. We like skim, do what you think is best)
  • 1 tsp. vanilla extract
  • 1/4 cup sugar
  • 1 pinch of salt
  • 1 egg
  • 1 egg yolk
  • 2 tbsp. cornstarch
For Wafer Crumble
  • 30 vanilla wafers
  • 3 tsp. sugar
  • 1/4 tsp. cardamom
  • 1 pinch of salt
  • 3 tbsp. unsalted butter 
In a small sauce pan, melt the butter over medium heat. Add the brown sugar and stir well to combine until the sugar is melted, about three minutes. This is you "caramel". Scoop into a bowl and set aside.

Slice your bananas into 1/2 inch "coins".

In your small sauce pan, add your banana slices, 2 cups of the milk, sugar, salt and vanilla extract. Cook over medium heat until it starts to steam, then strain the mixture in a colander.

Though the recipe instructs you to discard, we kept the vanilla-infused bananas for additional topping later!

In a small bowl, whisk together the egg, egg yolk, cornstarch and remaining 1/2 cup of milk. Add the mixture in with the rest of the pudding into the sauce pan, stirring to incorporate. Cook until the mixture thickens, stirring occasionally, until the mixture thickens and starts to boil, about 5 minutes.

Remember that "caramel" mix?

Add it to the pudding combo in the sauce pan. Reduce the heat to low and cook for about another five minutes.

Take your pudding and either pour into one dish or individual cups/ramekins. We were feeling sassy so we used martini glasses. Place plastic wrap over the top of the pudding to prevent a layer of "skin" from forming over the pudding. The directions said to refridgerate anywhere from 30 minutes to 24 hours. We started making this as we made our dinner so that as we ate, the pudding would being to congeal. The total time we let it cool was about 1.15 hours.

After eating our meal on the roof, we came back downstairs to finish off the food coma. The last step, and optional depending on your tastes, is making the vanilla wafer topping. Start this quick process by pre-heating the oven to 325 degrees.

Taking about thirty vanilla wafers (approximately equivalent to one box), place in a plastic bag and smash them up using the throw-down-on-the-ground-and-stomp method, or the less violent and perhaps preferred unless in need of aggressive release, the rolling-of-the-glass-or-measuring-cup over top. I suppose if you are really practical, a baker's pin would be nice to get the job done. I love that you put up with my nonsensical ramblings.

Melt the butter and add to the crushed wafers in a large bowl, followed by the sugar, cardamom and salt.

Line a baking sheet with parchment paper and top with the crumble topping. Toast in the oven until golden brown and fragrant, about 15 minutes.

Let cool. At this time, we mixed our reserved bananas from earlier with the crumbles and topped our pudding for a tasty treat! Grab a spoon and enjoy!


Tuesday, September 20, 2011

Caprese Salad


For our homemade gourmet dinner, Sarah and I made this caprese salad as an accomplice to the rest of our meal. You will only need a few ingredients for this one. I like to make this classic dish "my own" by reducing the balsamic vin over heat into a glaze and grilling the slices of tomatoes for added taste and texture. This was the first time I've used heirloom tomatoes and as a girl who gets easily squeemish about tomatoes in general, this is my new favorite kind to use.

Recipe made enough for three people, for more, increase your tomato use.

Grocery List:
  • 1 heirloom tomato
  • 1 red, round tomato
  • 1 ball of fresh mozzarella
  • 1 bunch of basil
  • 1/3 cup of balsamic vinegar
  • Olive oil

Go ahead and chiffonade your basil by stacking 3-5 leaves of similar size on top of one another and creating a tight roll, then cut thin strips vertically across the roll of basil.

Now cut thick slices of tomato - the thicker the slice, the better they'll be on the grill, they will shrink a bit in the heat so don't be afraid of the thick chop. Such beautiful coloring!

Add your tomatoes to a grilling surface and let cook for about three minutes per side, until those handsome grill marks appear. We lost some good slices out there, this is why the thicker the slice, the better.

Now slice your mozzarella into 1/4 inch slices.

While your tomatoes are grilling, add the balsamic vinegar into a sauce pan on medium heat. Let thicken for about 5-8 minutes, stirring frequently. Be careful not to burn or overheat or your vinegar will stick to the sides. And... I know about this from experience....

As the tomatoes finish, begin to place them on a plate with the mozzarella slices in between, then top with basil. The mozzarella will slightly soften and melt just a tad to your tomatoes. This is called heaven.

Drizzle just a tad of olive oil and then spoon your balsamic glaze over the tomatoes, mozzarella and basil for a beautiful and sumptuous outcome. Serve as an appetizer or a side dish!


Related Posts Plugin for WordPress, Blogger...

Print Friendly