Thursday, September 13, 2012

Make a Meal: Spinach-Basil Pesto Pasta with Caprese Chicken Stacks


For Labor Day, I had a fun little girls weekend with my two Maids of Honor. Amy and I went southbound 35 to visit Greer for a little time together, just the three of us and one thing I knew I could count on was a fun cooking night. We went to a local farmers market to find inspiration and ended up deciding on an Italian theme. We bought fresh vegetables and Italian peppers, then found a fresh pasta place where we bought three fresh pastas: a fettuccine, a spinach fusilli, and a pecorino-peppercorn cavatelli pasta. For sauces, we bought a vodka sauce from the pasta place then made our own fresh basil pesto. For toppings, we sauteed the fresh farmers market vegetables to toss with pasta and olive oil, then made some easy balsamic chicken chunks. When we put it all together, it was ahh-mazing. See below for our little pasta bar!
 

Fast forward to this week, Mr. Max and I were meal planning.  I was still having some serious food envy of all the leftovers that Greer had, and DVR envy from the ridiculous amount of recorded hours of The Hills, but that's another story. We may or may not have bypassed our Saturday plans to explore Austin so that we could watch 10.5 hours of that reality TV gold.
 

Busted. Name that scene! The "he's a sucky, sucky person" confrontation was one of the best between Lauren and Hiedi, next was the "you KNOW what you did" at Les Duex.

Back to the featured post dish, I was craving some pesto after thinking about the delicious stuff we made over Labor Day and decided to pick up some whole wheat fusilli to revamp my ever-changing chicken caprese. This recipe was quick and easy, I made it on one of my busiest work weeks of the year, meaning I was tired, maybe slightly grouchy and was ready to eat some dinner so I could go to bed. That said, this took all of 20 minutes from prep start to plated finish.

Nutritional facts can be found here.

Grocery List:
Recipe Yields 3-4 servings
For the Pesto Pasta (forgive me, rough estimates I tried to track as I went)
  • 1/2 cup spinach
  • 1/2 cup basil
  • 3 cloves of garlic
  • 3 large pinches of Parmesan
  • 2 tbsp. pine nuts
  • 1/4 cup olive oil
  • 1.5 cups spinach, packed
  • 2 cups pasta (I made extra for Mr. Max's appetite and a lunch portion)
For the Caprese Chicken
  • 3 chicken cutlets (4 oz. each)
  • 1 tbsp. olive oil
  • Italian seasoning
  • 2 tbsp. balsamic vinegar
  • 6 thin slices of part-skim mozzarella
  • 1 cup cherry tomatoes, halved  
  • Balsamic glaze

To start, pre-heat the oven to 425 degrees. Bring salted water to a boil and add the pasta noodles. Cook for about 8-10 minutes or until al dente. 

Next, combine the spinach, basil, garlic, pine nuts and Parm in the food processor and grind. Add the olive oil slowly and continue to grind until you've reached a smooth, desired pesto consistency.

Toss your tomatoes in just a splash of olive oil. Spread the halves over a baking sheet covered in aluminum foil and sprayed with non-stick cooking spray. Roast in the oven for twenty minutes until puckered and slightly browned.

Take your chicken cutlets and cut them in half so you have small, slider size slabs of chicken. Place them in a bowl and toss with olive oil and balsamic vinegar to evenly coat the chicken. Sprinkle with Italian seasoning.

Place the chicken in a foil lined baking dish and place in the oven for 4 minutes to cook. After 4 minutes, remove from the oven, flip and add the sliced mozzarella to the top of each chicken. Cook for another 5 minutes.


Once the pasta is ready, drain and dry with paper towels. In a large saute pan, combine the pasta with the pesto and add the additional spinach to let wilt over low-medium heat.

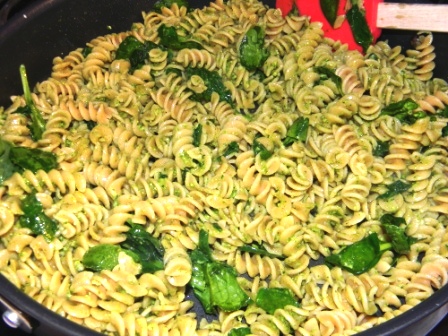
Once the chicken is ready, make a bed of the pasta on a plate or bowl and then top with the chicken and scoop of roasted tomatoes, then drizzle with an ever so slight balsamic glaze. In the picture at the very top of this post, I had stacked the chicken with layer of tomatoes between and again on top. In the one below, the two chicken pieces are side by side.


Tastefully yours,

Monday, August 27, 2012

Girls Night In: Hatch Fest!


Our Girls Nights In group resumed this month and we were excited to kick-off the second half of the year with a menu all about an August culinary staple - hatch chile peppers. When planning, I looked up a Central Market Cooking School Menu that Mr. Max and I wanted to go to. It was already full, so I thought this would be perfect for our girls night in!

The Central Market menu consisted of:
  • Hatch Ceviche with Avocado
  • Hatch Stuffed Flank Steak
  • Market Veggie in Hatch Butter
  • Hatch Corn Bread
  • Hatch Chocolate Cake
In communicating with the girls, we liked where they were going with this. We decided on doing the ceviche, the flank steak, veggies sans hatch butter and adding in the quinoa mac and cheese that Amy made only this time, with hatch chiles. We divvied it up and I volunteered the flank steak with a hatch-chimichurri that I concocted.

Meredith took the ceviche, Chandler brought the veggies, Amy revised the quinoa mac and Lindsey brought amazing wine to compliment the meal! Such a fun night, I love quality time with these girls. Stay tuned for the recipes coming soon!
Ceviche with Hatch and Avocado

Hatch-Chimichurri for the Flank Steak

Hatch Quinoa and Cheese

Carved Flank Steak with Sauce


Tastefully yours,


Sunday, August 26, 2012

Cauliflower Pizza Crust


After months of seeing this circulate the Pinterest blogosphere, I decided maybe we needed to try it. Max Man enjoys making a homemade pizza. We haven't done this in a long time but I could tell he had a hankering for it. I decided to beat him to the punch and let him know that I had a special crust to try from Recipe Girl.

To be honest, this was really easy to do. However, I don't know if it is a testament of the cauliflower recipe, my oven, or lack of a proper pizza stone/crisper but the crust didn't crisp the way a pizza crust should have. I give the taste a B+, I never once had the thought that I wasn't eating a conventional pizza crust, it was only lacking the even crisp throughout the pie, namely the middle area. Since the days of braces, I've always eaten pizza with a fork so that was an easy remedy when it came to eating. Max Max, on the other hand, well he was having a hard time trying to pick it up and shovel in his mouth, finally conceding to my fork method.  

Regardless of the crust, the taste was great and I would definitely recommend trying this. I am looking forward to making it again and working on ways to improve the crisp factor using a pizza stone, grilling it, broiling longer, who knows! Because I was so skeptical to begin with, I did not change this crust recipe at all from the source. We used it to make a half goat cheese-pesto pizza, half japapeno-pepperoni pizza, our favorites!

Nutritional facts can be found in Recipe Girl's post.

Grocery List:
  • 1 large head of cauliflower
  • 1 egg
  • 1 cup mozzarella cheese, finely shredded
  • 1 tsp. dried oregano
  • 1 tsp. garlic powder
  • 1/2 tsp. onion powder
To start, preheat your oven to 450 degrees. Next, use a cheese grater to grate the cauliflower head until you've reached the stems. Should equate to about 2 cups.
 

Cauliflower produces a lot of water so you will want to take a few paper towels to help squeeze the moisture out of the grated veggie.
 

The blogger whose recipe I followed also recommended nuking it in the microwave to help dry out the moisture. I did this for about 6 minutes and then removed. Then, I placed in the freezer to help with the time of cooling down so I could add the egg without it cooking into the cauliflower flakes. Once cooled, you may add the egg, cheese, oregano, garlic and onion powder. Stir well to combine.
 

Grease your surface of choice, whether you use a cookie sheet or pizza stone. Pat the dough into a thin and even layer on the sheet, about 9 inches in diameter. This does not stretch like a regular dough so be gentle and pat it out to stay connected. Spray the crust lightly with nonstick spray, this will help it brown. Place in the oven and cook for 15 minutes. If your edges are browned but your middle still feels doughy, I would in hindsight cover the edges with foil, only exposing the middle, and allow the pizza to cook for another 3 minutes to help firm up that middle area.

Next, remove the crust from the oven and it should be a firmer, golden brown.
 

Turn the oven up to broil. Top with your sauce and pizza toppings of choice, then place back into the oven and let broil on high for 5 minutes.

When ready, let cool for a few minutes, slice and serve!

Tastefully yours,

Friday, August 24, 2012

Make a Meal: Soy-Mustard Glazed Salmon with Bok Choy Fried Rice


This dish happened in one of my favorite ways: by accident. I had fully intended to do a different salmon dish based off a recent menu sampling for wedding food. I had sent our chef some of our recipes for the dinner portion but we were having a hard time narrowing down the passed appetizer options that both matched our dinner "theme" and were easy enough to eat. One of the choices he served was a jumbo bacon-wrapped shrimp with a dipping sauce. It was like a barbecue/poblano chutney; there was a sweet tang to it and a subtle smokey heat. We nixed it for an app because it was too high maintenance to consume, not a good finger food, but we just loved the sauce. He told me that since I shared my recipes with him, he would return the favor. He came back with a printed copy of his recipe and I was ready to use it!

I was all set for that until I left my wedding binder (with recipe tucked in the pocket) at work. Arriving home and realizing that, meant I had to come up with another plan.

Enter the Soy-Mustard Glaze Salmon. First of all, I don't really like anything that has mustard in the title. I can do mustard when it is a simple ingredient, an undertone of a recipe, but not as a prominent feature. However, I found this in America's Test Kitchen Light and Healthy 2012 when I was making the Miso-Orange Glazed Fish. I remember this second glaze recipe and decided to try that, since I had all the ingredients on-hand already.

Now let's discuss the bok choy fried rice. My friend Greer had recently asked me how to make bok choy so I had it on my mind. I got brown rice, some chopped carrots for another meal in the week and the bok choy. Max Man was ready to help so I asked him to chop the bok choy to fit the saute pan. I meant in half but didn't articulate that, and sweet man chopped it like lettuce for a salad. As I prepared it, I started to think through how I would pull this off, because it was shrinking like spinach. I looked at the finished brown rice and decided to dump that in the skillet with the bok choy and add the carrots along with other tasty ingredients. Yes, I liked where this was heading.

Nutritional facts for the salmon are located here; 6 WW points per 4 oz. salmon filet. Nutritional facts for the stir-fry are located here; 2 points for 1/2 cup serving of the rice.

Grocery List:
For Salmon - Recipe yields two servings
  • 2 salmon fillets (4-6 oz. each)
  • 2 tbsp. light brown sugar
  • 2 tbsp. tamari (organic, low-sodium soy sauce)
  • 2 tbsp. mirin
  • 1 tbsp. sherry vinegar
  • 1 tbsp. whole-grain mustard
  • 1 tbsp. water
  • 1 tsp. cornstarch
  • 1/4 tsp. red pepper flakes
For Bok Choy Stir Fry - Recipe yields 4 servings
  • 1 cup brown rice 
  • 2 cups bok choy, chopped
  • 2 cloves garlic, minced
  • 1 tsp. sesame oil
  • 1 cup carrots, diced 
  • 2 tbsp. low sodium stir-fry sauce 
To begin, let your grilling surface start warming up (if you decide to grill) or heat your oven at 350 degrees. Next, cook the rice according to the package. As the rice cooks, begin your salmon glaze by placing the brown sugar, tamari, mirin, sherry vinegar, mustard, water, corn starch and red pepper flakes into a shallow sauce pan. Let simmer on medium heat and thicken for 5-7 minutes, whisking well.

As your glaze perfects, pan sear the salmon. When you flip the salmon skin down, you are allowing the omegas to permeate down through the rest of the fish, fully getting those vitamins. Thank you Central Market man for enlightening me on that little brain nugget.
 

Once salmon fillets are seared on both sides, prep your cooking method. I use a grill basket and cover with aluminum foil, then place the salmon down. Lather the glaze on the tops of the fish and set on the grill for 15 minutes. 

Oh hey, chopped bok choy!

In a large skillet or chef's pan, let your bok choy begin to wilt with just a splash of oil and garlic. When wilted, add the rice and carrots. Add stir-fry sauce and mix well on medium heat for 5 minutes.

Once the salmon flakes at touch and is a light pink, dish out the stir-fry and top with the fish. Enjoy this taste foodie friends. I'm actually about to make this salmon again. For the fourth time this month but new side dish! 


Tastefully yours, 

Friday, July 20, 2012

Make a Meal: Grilled Chicken Kabobs with Sweet and Spicy Cucumber Salad


While I was on the same grocery trip that inspired the Apple Banana Muffins, I also grabbed a recipe card for grilled chicken with cucumber relish while at the meat counter. It sounded light and refreshing for a summer evening so it made it home with me. Like kismet, the next day I stumbled upon another cucumber recipe on pinterest and decided to grab inspiration from each, adapting and combining the two for this dish. The chicken kabobs were easy, the cucumbers were easy, what more can you want in a week night meal? Health and nutrition? You are in luck, because this dish has that too.

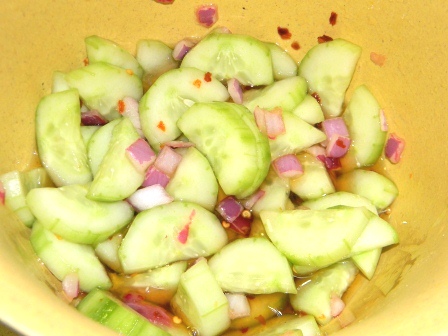
I loved the sweetness and kick of heat to the cucumber salad. It was a tasty contrast and something that would work great on its own at a BBQ, a shower or like this for dinner.

Click here for the nutritional facts calculated at SparkRecipes.com and 6 WW points for one serving.

Grocery List:
Recipe yields 4 servings

For Chicken

  • 1 lb chicken, cubed
  • 4 cloves garlic, minced
  • 3 tbsp. Worcestershire sauce
For Cucumber Salad
  • 1 cucumber, peeled and quartered
  • Salt
  • 1/4 cup Mirin (rice wine vinegar)
  • 1/4 cup water
  • 1 tsp. crushed red pepper flakes 
  • 1 tsp. sugar
  • 2 tbsp. red onion, minced
  • 3 tbsp. feta cheese, crumbled
  • Baby spinach (optional for salad greens)

To begin, heat your grilling surface and brush with oil to help prevent the kabobs from sticking. Next, take your cucumbers and set in a colander. This next step I learned from the original recipe, it's very important to season with salt to help dry out the fruit. Otherwise, they will water down the final product. Salt and let sit for about 15 minutes, then pat dry with paper towels.
 

In a mixing bowl, combine the cubed chicken with the minced garlic and Worcestershire sauce. Let marinate for about 10 minutes and then thread bamboo or metal kabobs with about 5-6 pieces of chicken, resulting in about 4 oz. on each kabob.
 

While the chicken is marinating and the cucumbers are "salting," you multitask and move on to the cucumber salad sauce. In a small sauce pan, heat the mirin, water, sugar and red pepper flakes over medium high. Whisk together and let reduce to about 1/3 cup, about 10 minutes.
 

Once reduced, set to the side, add the red onion and let cool to room temperature.
 

Toss with cucumbers and add feta cheese, then place in fridge to serve chilled.
   

Grill the chicken kabobs, about 6 minutes on each side.
 

Once done, bring inside and assemble your plate. We used a bed of spinach leaves to enhance the green factor and add nutrients to the dinner. Spoon the cucumber salad atop the spinach and grab a kabob, dinner is served my friends!


Tastefully yours,


Asian Veggie and Chicken Wrap


I told you we've been on a wrap kick lately! Following the salmon and veggie stir fry dinner, I had about half a box of left over veggie strips from the produce area of Whole Foods. I used half of them for dinner and decided to prepare and use the rest for lunches during the week. I was able to simply saute in just a pinch of olive oil and then pair with shredded rotisserie chicken. Equipped with whole grain lavash bread and baby spinach, I quickly assembled an easy and healthy lunch! To decrease the sodium levels, I sauteed these veggies plain, using only the stir fry sauce to add a little flavor in the end.

The benefits to using a whole grain lavash bread over a tortilla or pita is that it has less carbs, no cholesterol and lavash is higher in protein and fiber.

Nutritional facts can be found here, calculated at SparkRecipes.com; one serving of this lunch is 6 WW points.

Grocery List:
Recipe yields 1 serving
  • 1 whole wheat lavash 
  • 1 cup baby spinach leaves
  • 1/2 cup sauteed vegetable strips (bell peppers, squash, zucchini, carrots, red onions)
  • 1/4 cup shredded chicken
  • 1 tsp. stir fry sauce 

Just like with the Chicken Caprese Wrap and the Mexi-Texi Wrap we will want to leave about an inch from both ends and begin to layer the filling 2 inches into the wrap. Layer the lavash as follows: spinach, veggies, chicken. Take the stir fry sauce and drizzle a light layer across the top.
 

To wrap, fold the ends inward and try to tightly roll, starting with the end where the filling is. Set seam side down. Cut in half on a diagonal bias and enjoy!


Tastefully yours,


Related Posts Plugin for WordPress, Blogger...

Print Friendly