Monday, January 30, 2012

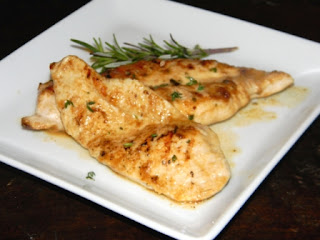
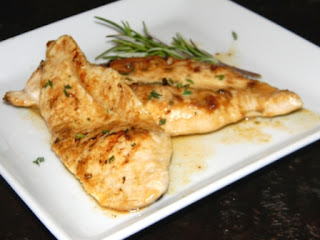
Grilled Rosemary-Dijon Chicken


I needed a protein to add to dinner and initially wanted something "Frenchy" to go with the (not so) French Onion Soup. I decided on chicken - simple enough - but then began to experiment with ingredients for the dish, resulting in a tasty marinade for a grilled chicken full of flavor. The thought process was rather scattered so I'll save you from that, but starting out I knew I would use Dijon mustard and fresh rosemary. From there, the final product somehow came together. I did my best to measure out the ingredient use and it goes a little something like this....

Grocery List:
  • 3 tbsp. olive oil
  • 1 tsp. lemon juice
  • 1 tsp. soy sauce
  • 1 tbsp. dijon mustard
  • 1 tsp. fresh rosemary
  • Garlic powder to taste
  • Salt to taste
  • 2 chicken cutlets (4-6 oz. each)
In a small bowl, combine the first 5 ingredients and whisk together. After the success of the soy sauce to achieve the taste I was seeking for the soup, I decided to use it as an ingredient again with this marinade. Results? Fantastic, adding just the right amount of punch to soften, yet compliment the Dijon. Season with garlic powder and salt, to taste. Finger-tip test it out to make sure your taste buds agree with what is in the bowl and adjust if needed.

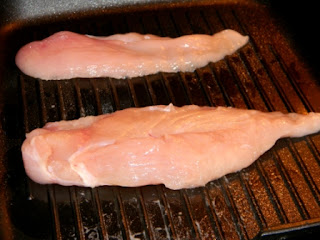
Heat a griddle pan to medium heat (a 6 on the dial) and place your chicken cutlets on the pan. Cook for 3 minutes. Brush the rosemary-Dijon concoction over top and flip.


Cook the chicken on the flipped side for another 5 minutes, smothering the top in a layer of the marinade as it grills. Do one more flip for 1 minute each and your chicken should be cooked through with faint, yet handsome, grill marks on either side. Top with additional rosemary for garnish and you are ready to serve.


Tastefully yours, 

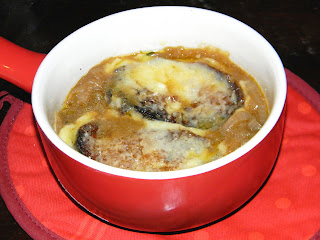
(Not So) French Onion Soup


Last January, Mr. Max and I experimented with our first French Onion Soup recipe. This was my first experience to caramelize onions for a prolonged period, not just quickly for say, fajitas. I felt as though I let my impatient nature get the best of me, not allowing the onions to reach prime sweet form by caramelizing long enough. Over the past few months, French Onion Soup has become a regular pre-meal delight when we've dined out at places like Nosh, Morton's and the Warwick Hotel's Landmark restaurant.

Tonight, we decided to stir up some taste, making a not-so-French-onion-soup. Looking at my last recipe, I knew a few things I wanted to change. I added brown sugar, only used 2 vidalia onions and nixed the red onion. I also used less white wine allowing it to evaporate longer creating more of a glaze, along with less beef stock, and replaced the Swiss with Gruyere cheese. Then came two secret ingredients: Dijon mustard and soy sauce. Say what?

As I taste-tested the broth, the sweetness was there, but I felt something was missing. The beef broth slightly dilutes the flavor once stirred in, adding more of a watery taste. I needed that tang that makes it impossible to resist going back for another bite. I was already using the Dijon mustard for a chicken recipe so I tried that first, then added sea salt and garlic powder. That made an impact but it wasn't there yet. Staring at my fridge, I needed a punch of tang. I was out of balsamic so I grabbed the soy adding just enough to make a statement. Took a sip and it was just right! When it came time to spoon and sip, I waited for Mr. Max's reaction which was a big caveman nod and an MMMM. Mission accomplished.

Grocery List:
For 2 hearty servings
  • 2 tbsp. butter
  • 2 sweet yellow onions, sliced into thin 1/8" rings
  • 1/4 cup white wine (I used chardonnay)
  • 3 cups beef broth
  • 1 tsp. fresh thyme
  • 4 tsp. brown sugar
  • 1 tsp. Dijon mustard
  • 3 tsp. soy sauce (I used Tamari)
  • Garlic Powder to taste (start with 1/2 tsp. and sprinkle away from there)
  • Sea Salt to taste
  • 4 slices from Baguette
  • Gruyere cheese, sliced thin
First thing is first: allot yourself time for the pursuit of the perfect onions. I would recommend 90 minutes for the caramelization process, and then the rest flows quickly after that. To begin, add your butter and onions to a dutch oven over low-medium heat (dial set at 3 or 4).

Cover for about 10 minutes until butter is melted and the onions begin to soften. Uncover and add 2 tsp. of the brown sugar, stir in and cover. Set the timer for 45 minutes and then go do something else. Get on Pinterest, clean your house, catch up on the DVR, knit a scarf... just walk away. Every now and then, when you need a water refill or something, you may want to peek in and give it a quick stir to loosen up onions from sticking to the bottom, or any browned bits to keep from burning.

When the timer goes off, uncover, add the remaining 2 tsp. of brown sugar and now the wine, stir and lower the heat to a 2 or 3 on the dial. The onions will already look golden, there will be browned areas in the pan, stir it around and set that timer for another 35 minutes. Now we allow the wine to evaporate and kinda glaze the onions a bit, mixing with the butter and brown sugar.
 

When the timer goes off, pull out a string and taste - see how good that is! Now, we add the beef broth, thyme, Dijon and soy sauce, then season with garlic powder and salt to taste. Bring this to a boil, uncovered, a cook for about 5 minutes.

While that cooks, slice up your Gruyere and baguette. Set the oven to broil and toast the baguette slices for about 2 minutes.

Ladle your soup into oven-safe, high heat tolerant bowls.

Top with baguettes (I used 2 in each bowl to span the width of the soup bowls), and top with cheese. I thought I had a better cheese slicer, but alas, it did not give me a beautiful large slice of cheese as I had wanted. Therefore, we had to make-do with several smaller slices to cover the top.

Place in the oven a top a cooking sheet and broil for another 2 minutes until the cheese is a melty, bubbling, browned layer.

Remove from oven, let cool - bowls will be HOT. Set on a hot pad to be nice to your table surface, top with any additional thyme for garnish and enjoy!

Tastefully yours,

Wednesday, January 18, 2012

Broccoli-Quinoa Casserole


Looking for something new to add to your side-dish rotation? This was a great pinterest find that revamps the typical broccoli-rice casserole, substituting the rice for the nutrient power house, protein-packed quinoa. It was easy to make, and even easier to eat. I only wish I had chopped the broccoli smaller and used more of it like another favorite starring these two headlining ingredients in the double broccoli quinoa recipe. Even though I nixed the mayonnaise in the original version, there was more of a liquid consistency than I would have liked. Next time, I might try using 3/4 of the soup to see how that blends, before adding the whole can. This dish re-heats well and makes for a great lunch the next day!

Nutrition facts include: 199 calories, 10g protein, 9g fat, 14g carbs, 2g fiber, 1g sugar, 297mg sodium. 

Grocery List:
  • 2 cups broccoli florets, cooked
  • 10 oz can Cream of Broccoli soup
  • 2 tbsp. light milk
  • 1/2 cup reduced fat cheese (I used a Monterrey Jack blend)
  • 1/2 tsp. Splenda (or sugar)
  • Salt and pepper to taste
  • Dash of nutmeg
  • 1 cup quinoa, cooked according to package
  • 1/2 cup grated Parmesan cheese, divided
To start, wash and prepare the quinoa according to the package. As it cooks, toss your broccoli in olive oil and season with salt, pepper and any other go-to veggie seasoning you like to use. I have my Tommy's "The Mix" spice brand from Whole Foods that I always use on my veggies. Place in a cast iron griddle or roasting pan and set in the oven for 15 minutes on 425 degrees.

In a mixing bowl, combine your Cream of Broccoli soup, milk, sugar, nutmeg, and Monterrey Jack cheese.

When the broccoli is roasted and the quinoa is cooked, add the greens and grains along with 1/4 cup of Parmesan cheese.

Spray a baking dish with no-stick spray, then add the casserole contents, spreading evenly. Top with the remaining 1/4 cup of Parmesan cheese.

Bake in the oven at 350 degrees for 30 minutes until edges are bubbling and the top is golden brown. Let cool, dish it out and serve it up!
 Paired with a spinach. cranberry and walnut salad,

Tastefully yours, 

Tuesday, January 17, 2012

Chicken "Caprese"


I've made variations of this recipe for years now - from a slice of tomato to diced tomato, from thick slices of mozzarella to shredded mozzarella, from stuffing the chicken to ingredients layered on top - it's always changing! This time I decided to nix the basil strips and sneak in some greens using spinach, saving dried basil as a simple garnish. It only takes 10 minutes to prepare, and you will have it on the table in 20 minutes from prep start to fork finish.

According to SparkRecipes.com, I calculated that each serving is 200 calories, 7g fat, 75mg sodium, 3g carbs, 1g fiber, 2g sugar, and 28g protein.

Grocery List
  • 4 chicken cutlets (already pounded 1/4 inch thick)
  • 1 cup de-stemmed spinach leaves
  • 1/2 cup part skim mozzarella, shredded
  • 1 Roma tomato, diced
  • Olive oil
  • 1 tsp. Italian seasoning
  • Dried basil, to taste
  • Balsamic Glaze (it is so versatile, I highly recommend purchasing some!)
Start by pre-heating your oven to 425 degrees and coat a baking dish with no-stick spray. Put your diced tomatoes in a bowl with a dash of olive oil and Italian seasoning, mix well.

Place the chicken cutlets in the baking dish, layer with spinach and tomatoes.

Bake the chicken for 8 minutes on the middle/lower rack. When the timer goes off, sprinkle the mozzarella cheese over top each and continue baking for another 2 minutes. Once the cheese is melted and slightly golden, remove from oven, top with a shake of basil and drizzle balsamic glaze over top to serve.
Paired with simple spaghetti squash and roasted garlic tomato sauce

Tastefully yours, 


Monday, January 16, 2012

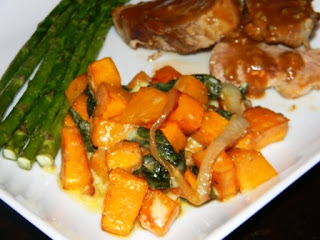
Roasted Butternut Squash with Gorgonzola and Crispy Sage


Another Pinterest find, this dish was absolutely amazing. Upon reading the recipe, I was interested in the taste combination of the robust Gorgonzola, sweetness of both the butternut squash and the caramelized onion, then the crispy sage. I adapted this recipe slightly, mainly in regard to the squash preparation. I made my go-to roasted version coating the cubes in olive oil, dash of punchy balsamic vinegar, then dusted with rosemary and thyme. This gave the squash great dimension and elevated the overall taste of the dish as it blended with the other ingredients. Mr. Max immediately requested for a repeat performance of this side soon, something I always take as a good sign. The longest part of this recipe process is roasting the squash and caramelizing the onions, both timed around 20 minutes. If you do these at the same time, you can multitask and cook other parts of your meal or get things done around the house.

Grocery List:
  • 2 cups butternut squash, cubed
  • 2 tbsp. olive oil
  • 3 shakes of thyme
  • 3 shakes of rosemary
  • 1 tsp. balsamic vinegar
  • 1 onion, chopped into thin rings
  • 2 tbsp. butter, divided
  • 1 tbsp. brown sugar
  • 1/4 cup fresh sage leaves, de-stemmed
  • 1/4 cup Gorgonzola crumbles

Pre-heat your oven to 450 degrees. Toss your cubed butternut squash bites in the olive oil, thyme, rosemary and balsamic.

Spread out on a cooking sheet and pop in the oven for 20 minutes to roast.

Take your onions and add them to a skillet with 1 tbsp. butter. Cook on low heat (3 on the dial), covered, to caramelize. After about 15 minutes, add the brown sugar and saute. Recover and check back every few minutes to move them around in the pan. Total caramelizing time this go-round was 20 minutes.

When the oven goes off, check your roasted squash. Make sure they are soft to bite into and enjoy, but enough but not mushy.

As your squash cools, fry your sage. Using 1 tbsp. butter, melt over medium-high heat, and add the sage leaves. Cook for 3 minutes total to achieve a delicious, crunchy piece of sage. Side story: first time to try this was at the Central Market Gnocchi and Gnudi class with foodie friend, Greer. We fried some sage for the sweet potato gnocchi and I was surprised at the transformation of the taste of that little herb. It takes on almost a salty personality, and with the crisp, it was like a little chip. It was love at first bite. Moving on...

Once your sage is crisped, your squash is roasted and your onions are caramelized, add them to a large skillet or chef's pan. Combine the ingredients over medium heat then add the Gorgonzola crumbles.

Just when the cheese starts to melt, pull off the heat and you are ready to serve!
Tastefully yours,

Sunday, January 15, 2012

Make a Meal: Salmon with Herbed Wine Sauce and Veggie Ribbons


After the holidays, and starting a new year, lighter dinners are a priority. I decided to try out the veggie ribbon concept and pair with a simple salmon, jazzed up with a herbed wine sauce from a grocery store recipe card. I was slightly concerned that the veggie ribbons would not go over well with Mr. Max's taste buds, but this gets the dude seal of approval. This meal took less than 30 minutes to prepare, making it a perfect weeknight dish.

Grocery List:
For Veggie Ribbons
  • 1 yellow squash, skin removed
  • 1 zucchini squash, skin removed
  • 1 carrot, skin removed
  • 1 tbsp. olive oil
  • Parsley, to taste
  • Garlic powder, to taste
  • 1/4 cup grated Parmesan (I prefer Parmigiano Reggiano or Pecorino Romano for the best flavor)
For Salmon with Herbed White Wine Sauce
  • 2 6 oz. salmon fillets
  • 1 tbsp. olive oil 
  • 1 tsp. Herbs de Provence
  • 1 minced shallot
  • 1 smashed garlic clove
  • 1/2 cup dry white wine (I used a chardonnay)
  • 1/2 cup chicken broth
  • 1 tbsp. chopped thyme
  • 1 tbsp. butter, room temperature
  • 1 tbsp flour
  • Salt and pepper to taste
Start by pre-heating your oven to 400 degree. In a small bowl, combine 1 tbsp. of olive oil and the Herbs de Provence, then brush over the salmon fillets.
Place the salmon in the oven for 15-18 minutes. While the salmon is cooking, using a veggie peeler, peel thick strips of the zucchini, squash and carrot, discarding the outer skins. Each vegetable should make about 1 cup of peeled strands. To create a more "noodled" ribbon, you could cut the strands into thirds from the original strand.
In a skillet, add the 1 tbsp. olive oil and heat on medium-high. Add the ribbons and begin to saute for about 15 minutes total. As the veggie ribbons cook, add the parsley and garlic powder, along with any salt or pepper to taste. Last step is to add the Parmesan then toss the veggies for a finished touch.
The salmon should be getting close, so now it is sauce time. In a small bowl, mix the butter and the flour in a small bowl then set aside. 

Place the garlic and the shallot in a sauce pan with the wine over medium-high heat. Let the wine reduce by half. 

Add in the broth and bring to a boil, then start adding in the butter/flour mixture in pea-sized portions while stirring until thickened. Add the thyme and season to taste with salt and pepper.

To serve, put it all together, spoon the sauce over top the salmon and you have a delicious and nutritious dish!
Paired with an olive oil and garlic couscous

Tastefully yours,

Related Posts Plugin for WordPress, Blogger...

Print Friendly