Sunday, February 27, 2011

Academy Awards Tapas Party


The event planner part of me has always wanted to host an annual Oscar party - red carpet entrance, faux grammy banner for fun pictures, ballots to cast guest votes for who will win each category, fashion police, glamorous drinks and decadent food. Some day. One day. Sigh.

Sadly, my little working-girl, nugget of an apartment just doesn't provide the right hosting space so for now, this girl's got her dream. As I sit here thinking about a dinner for this evening, I decided to pretend my Oscar party was in short reach and make up a fun menu of various tapas for Mr. Max and myself.

I've wanted to try an array of tapas such as spanish meatballs, spanakopita, baked zucchini sticks, skewers of various meats and cheeses, etc. I've searched for some base recipes and created a fun little tapas menu for two. One of these days it'll be a party tradition, I look forward to that.

Stay tuned for the end result and a post for a dual-sauce gnocchi (low cal gorgonzola "cream" sauce and a fiery homemade tomato arrabiata sauce) from earlier this week. I can't find my battery charger for my camera so we have a bit of a hold up, that is today's mission!

Thursday, February 24, 2011

Gnocchi with Gorgonzola Sauce AND Red Pepper Tomato Sauce

A fellow foodie, and long time best friend of mine recently signed for a Gnocchi & Gnuddi Central Market cooking class. In honor of that, I've decided to make the packaged gnocchi in my pantry for possibly the last time, before I learn to make it on my own!

This is a quick fix dinner tonight, you are only really making two different sauce options. I had the idea for the different sauces after ordering a gnocchi dish at a cute Italian place last month - one was a tomato sauce, the other was a Gorgonzola cream. I couldn't decide between the two, both Mr. Max and I loved both of them, so decided to do a little of both again. My apologies, the camera battery died in the middle of this. The tomato sauce was just whipped up from things I already had, didn't get fancy with it - the gorgonzola sauce is a recipe printout I've had for a while now, I think coming from Allrecipes.com at 98 calories per serving (serving size 1/2 cup).

Grocery List:
  • 1 package of tri-colored gnocchi
  • Salt
for red pepper tomato sauce
  • 2 plum tomatoes, diced
  • 4 cloves garlic, minced
  • 2 tbsp. tomato paste
  • Red pepper flakes
  • Salt and pepper to taste
for Gorgonzola "cream" sauce
  • 3 tbsp. butter
  • 3 tbsp. crumbled Gorgonzola cheese
  • 1 green onion, minced
  • 1 clove garlic, minced
  • 1 tbsp. half and half
Start by pre-heating your oven to 425 degrees. Combine your dived tomatoes and minced garlic. Spray a pan with no-stick spray and arrange your tomatoes and garlic. Roast in the oven for 20 minutes.


While your tomatoes are roasting, take your gnocchi and put it in a pot with water. Lightly salt the water and bring to a boil. Once the gnocchi dumplings are soft and floating, drain and set aside.

Once the tomatoes are roasted, take them out and put them in a small pot. Add the tomato paste and then, using an immersion blender, puree the tomatoes, garlic and paste together to make a homemade tomato sauce. Season with salt and pepper, then add your red pepper flakes to taste.
Let this sit on the stove on low heat to keep warm as you prepare your other sauce.

In a small saucepan, combine the butter, gorgonzola cheese, green onion, garlic and pepper over low heat. Warm slowly for about 5 minutes, stirring often. Add the half & half to make the sauce creamier.


Once both your sauces are finished, dish out the gnocchi and top with sauce, garnish with fresh basil or Parmesan cheese. I served with a simple grilled chicken cutlet topped with Italian seasoning and Parmesan cheese over a fresh mixed greens salad.

Here we are bringing back the old-school camera phone shots to depict the finished product - Mr. Max's favorite was the red pepper sauce, my favorite was definitely the gorgonzola sauce. It was a great little dinner for a week night taking only 30 minutes to whip up!

Monday, February 21, 2011

Deviled Chicken with Sauteed Broccoli and Shallots

I have felt a slump coming on, the need for new recipes is growing. I've decided to start Throwback Thursday where I will take a meal I've already made, re-post it as I give it another shot with new additions or comments. This will commence next week as we kick off the month of March!

Back to my slump, where I had no solution until 5 minutes ago for tonight's dinner. I came home, started thumbing through my favorite go-to magazines to find I've made everything that was of interest to us. Then, I found a dog-eared page that was stuck to another page in my Cooking Light Holiday Special magazine. The recipe is for Deviled Chicken and reading it, I decided to look back at my deviled roasted potato recipe to liven this dish up a little more. Nutritional facts include 214 calories, 3.g fat, 34g protein, 8.8g carbs, 90mg cholesterol, 16mg iron, 17mg calcium.

The broccoli shallot recipe contains 48 calories, 2.4g fat and 178mg sodium.

Grocery List:
For chicken
  • 2 chicken breast cutlets (I cut them in half for 4 small pieces of thin chicken)
  • Olive oil
  • Salt and pepper to taste
  • Cooking spray
  • 2 tablespoons yellow mustard
  • 1/2 tsp. red pepper flakes
  • White wine vinegar
  • Panko bread crumbs
For broccoli
  • 2 cups broccoli florets
  • 1 tbsp olive oil
  • 2-3 tbsp. shallot, minced
  • Garlic salt
Start by preheating your oven to 475 degrees. Season your chicken with salt and pepper then lightly coat in cooking spray. Put in the oven and cook for 10 minutes.


Mix the prepared mustard, red pepper flakes and white wine vinegar in a small bowl. After the chicken has cooked for 10 minutes, take out of the oven and apply the mustard mixture to the top of each chicken breast.


Sprinkle the breadcrumbs over top and gently press to adhere. Finally, lightly coat again with cooking spray and then stick back in the oven for another 10 minutes.


While the chicken is in the oven, steam your broccoli in a skillet with 1/4 cup of water until bright green and tender. Drain excess water and add olive oil to skillet. Add minced shallot to the pan and saute on medium-high heat with broccoli. Sprinkle garlic salt over the veggies for added flavor.


Served with a fresh-outta-the-box Parmesan risotto.

Pork Tenderloin Flautas

Last week I had an event at my favorite "special occasion" restaurant, Javier's. Their food is incredible and it's very man-den, authentic old Mexico City dining. They have the most incredible "green sauce" that you eat with butter. Yes, butter. And the Filet Cantinflas (chihuahua cheese stuffed filet of beef) with a margarita will put you over the moon. Point of that was all to say that while I was there for this happy hour, they were serving these amazing little flauta appetizers that I just did not get enough of. I saw this recipe from a fellow blogger and thought to myself that I should try this - and here we are.

This was really quick and easy to make, not a lot of fuss or preparation. I will tell you that I am not a very good tortilla roller, I get frustrated when I try to roll them smaller and they just won't do it. I had this experience with the flautas, but in the end they tasted great and I didn't care that they happened to be the sized of enchiladas.

Grocery Store:
  • 1 pork tenderloin, diced
  • 1 yellow sweet onion
  • Olive oil
  • Tony's Creole Seasoning
  • Lawry's Seasoning Salt
  • Paprika
  • Chili Powder
  • Garlic Salt
  • Cumin
  • Oregano
  • Fresh cilantro
  • Flour Tortillas
  • Monterrey Jack cheese
Preheat your oven to 375 degrees and spray your casserole dish with no stick spray.

Slice up some onion rings and throw them in a heated skillet with about a tablespoon of olive oil. Season with Lawry's and Tony's creole for added flavor.


Let cook for about 8 minutes on low-medium heat to caramelize. I cooked the onions in two rounds because I wanted them to caramelize well without the additional onions in the pan.


While your onions cook, dice up your pork tenderloin into small chunks then put them in a mixing bowl.


I went by the 3-5 shake rule on the rest of the spices, depending what I liked the most. I started with 4 shakes of Paprika, 5 shakes of chili powder, 5 shakes garlic salt, 4 shakes cumin and 3 shakes oregano. I chopped up fresh cilantro and added 2 pinches. Mix it all up.


Once the onions are done, set on a plate and keep warm sitting in the microwave until ready to use. Adding a dab of olive oil to the pan, turn the heat to medium and add the pork and spice mix. Cover the skillet with a top and let sizzle on medium heat for about 5 minutes, stirring occasionally to flip the meat and break it up.


Take your tortillas, sprinkle the cheese down the center. Next, place the onions over top. Followed by the pork.


Roll them as tight as you can and place seam side down in your casserole dish. Follow suit until you've reached maximum capacity in your dish.


Pop in the oven for 10 minutes, then take out, flip and repeat for another 10 minutes. You want these suckers to be browned and crisp so after cooking 10 minutes on either side, take them out and see if they are ready. If not, put them back in for another 5 minutes, max - you don't want them to be too dry. Once finishes, take them out and let cool for about 2 minutes. Serve with guacamole, sour cream, refried beans, whatever your heart desires!

Sunday, February 20, 2011

Central Market Cooking Tips


Last night my favorite sous chef and I had date night at Central Market for their Texas Tastes Couples Night Out class. It wasn't until we were exiting the highway did it hit me - I left my camera, in its new case, sitting on the kitchen island when I ran out the door. I took a few pictures of the finished products with my phone but those hardly do it justice.

Aside from cooking some hands down amazing food, we also learned 3 helpful tips that I thought I would share with you.

1) When it comes to grilling, it is our instinct to want to yank the meat off the grill to flip so it won't stick. The truth is, it is going to stick no matter what. Meat is a protein which has complex sugars and often marinades, so they will always stick until they are ready to be flipped. You will know they are ready when you don't have to tug them at all. It is those sugars that help caramelize the surfaces, creating that beautiful "grill" look. So lesson: Don't flip your meat until it is ready, you will know when it is ready when you go to flip it and it comes right up.

2) Testing to see if meat is done: how many of us cut into meat to see if it's finished, has the right pinkness or none at all? Well don't do that. The analogy they used was that you would never drive a 3 hour road trip and once you get there open the hood of your car, would you? No. Cutting into your meat leaks out all of the juices you would want to stay in, then if you put it back in, you dry it all up. To test if your meat is done, take your palm and relax it, the testing surface will be the fleshy area of your palm where you thumb is....
  • For rare, touch your thumb to your pointer finger (fleshy feeling)
  • For medium, touch thumb and middle finger (gets firmer)
  • for medium-well touch middle finger and thumb (much more firm)
  • and if you like it well done, it will feel like your pinky and thumb touching (very firm)
This "rule of thumb" (ha, get it!) works for all meat!

3) Last but not least, while we did already know to only grill with canola oil, this helpful tip was to keep a paper towel soaked in canola in a bowl, it is easy to apply to wipe down the grilling surface.

I hope these little tips come in handy for you! Here are the pictures from our Texas Tastes dinner. We have a packet with all of the recipes and fully intend to make them again so stay tuned for the step by step!

Grilled Quail Salad with mixed greens, a creamy spiced buttermilk dressing, dried cherries and creole toasted walnuts


Chipotle cheddar grits, green bean and squash medley with roasted bell peppers, Texas surf and turf (beef tenderloin filet topped with tomatillo, jalepeno and pepper jack cheese with creole seasoned grilled shrimp and a burgundy demi glace)


Buttermilk ice cream and apple crisp

Saturday, February 19, 2011

Bananas Paradise

After a night out celebrating a best friend's birthday at Benihana, I was in food coma. As I walked out the door thinking how could I possibly eat anything more, I found that in the 15 minute car ride home, there was magically room again. Before we left, they had tried to sway us to order their Banana Tempura for dessert. The more I thought, the more I pined for that banana treat then realized I had bananas and my own version at home.

When I was little, I used to tell my mom that I was full off of the "real food" but I had so much room for the "junk food" left. I would demonstrate this column-like illusion on myself and point to where my real food level was - usually at my head - and then point to where my junk food level was, usually at my knees. This imaginative fib would usually land me an eye roll or two and sent back to finish my broccoli before I could even think of ice cream for dessert. Perhaps I was onto something there after all...

This one is an original, an inspiration from an email recipe ages ago but no idea what it initially read, I got the gist of the recipe and that is all that matters. After the first time I made it for Mr. Max, it become his most requested anything. What began as bananas foster, became affectionately labeled as banana hammocks (our maturity at its finest), and finally bananas paradise which is a little better. The only thing you have to do is control the heat of the stove and know when to flip them.

Grocery List:
  • 2 bananas, peeled
  • 3 tbsp. butter
  • 3 spoonfuls of brown sugar
  • 1/4 cup triple sec
  • Cinnamon
Start by cutting your bananas in half across the middle of the fruit. Then, cut them down the middle - it's easier to cut them down the middle after they are already shorter because they will break on you otherwise.


In a skillet, begin to melt your butter on medium heat. Once it is bubbling, add the bananas and turn up the heat to medium high (between 6-8 if you have a stove with numbers on a dial).


After about 5 minutes, ever so delicately with a spoon - yes, spoon - flip them over. They will be very soft and mushy I've tried using tongs and they rip the nanner apart. Add the triple sec and brown sugar at this time. Using your wrist, move the contents of the pan around from the handle. Set back on heat and let sit for about 5 minutes.


Carefully flip again, you will see the contents darkening in the pan, the bananas browning - this is good. After flipping, spoon the contents onto the bananas as they continue to cook. Now, sprinkle cinnamon across them.


After another 5 minutes, your bananas should be browned on both sides, with a crisp caramelized coating.


Scoop a little bit of vanilla ice cream into a bowl, then spoon some banana over top, drizzling with the left over juices from the pan.


Heaven, enjoy!

Tuesday, February 15, 2011

A New Kind of Chicken Spaghetti

Again, Mandy comes through for me with this creative recipe for chicken spaghetti using a pureed butternut squash in the sauce. After reading through her recipe, I decided to give spaghetti squash another shot. I did half of the casserole dish with linguine pasta noodles on one side and the other with spaghetti squash.

This is my adaptation and we LOVED it! It was a great "change-up" meal, making enough for Mr. Max to have a second helping as well as enough for leftover lunches the rest of the week. I'm excited to share a new favorite which you can choose to make any way you want to. I'm already thinking of ways to vamp it up more next time, perhaps trying a squash trifecta dicing up zucchini to include and maybe even adding some black beans for a vegan version, taking out the chicken? So many possibilities, thoughts?

I'll also say, this sauce was amazing, I would like to use it as a regular homemade pasta sauce for future recipes.

Grocery List:
  • 1 spaghetti squash
  • 1 cup butternut squash, chopped into small bites
  • Vegetable oil cooking spray
  • 8 oz of spaghetti noodles (about 1/2 a box - I break in half, as well)
  • 1 can Cream of Chicken
  • 1 can Fire Roasted Diced Tomatoes with Chipotle Peppers (tomatoes with green chiles would also work but I accidentally grabbed these for a pleasant surprise and highly recommend)
  • 1/4 cup vegetable broth
  • 4 oz reduced fat cream cheese, softened
  • Garlic Salt
  • Italian Seasoning
  • Reduced fat cheese (I used a Mexican cheese blend)
  • Parmesan cheese
Pre-heat your oven to 475 degrees. I bought butternut squash already cut up for ease, then diced it up into smaller bits. Spray an oven safe dish with vegetable spray and place the butternut squash into it. Roast the butternut squash for 20 minutes to help seal in the natural nutrients of the veggie.


I bought pre-cooked chicken breasts from Whole Foods to help cut down on cook time. Dice up your chicken and set aside.


In a pot, boil your noodles until al dente - about 15 minutes, drain and set aside. For your spaghetti squash preparation, using a fork, pierce holes all over to help cook. Place on a safe plate and microwave for 10 - 12 minutes. I did 12 minutes the first time making it and it was perfect, this time I felt I overcooked it a bit, so 10 minutes may have been better. Carefully cut the squash in half (it will be very hot, may want to let cool or wear protective mitts), remove the center seeds. Use the fork to scrape the spaghetti squash into a bowl and set aside. See pictures of this process here.

Pour your can of diced tomatoes and peppers into the skillet on medium heat, followed by the cream of chicken and the diced chicken. Stir and then add the softened cream cheese.


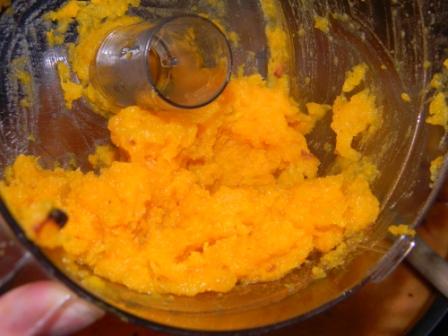
While this is heating, take your roasted butternut squash and place in a food processor. Add the chicken stock and puree in the food processor (or blender if you don't have a food processor)


Add the pureed squash into the skillet. Finally, season with a few shakes of garlic salt and Italian seasoning.


Pour about 1 cup of sauce into your spaghetti squash bowl; do the same with your spaghetti pasta bowl. Stir each separately.


Grease a 10x13 casserole dish and fill each side with the separate spaghettis. Top with the remaining sauce.


Next add the cheeses...


Pop in the oven for 20 minutes until cheese is bubbly and golden. Let cool for about 5 minutes, then serve to have an incredible meal.


We both had a some of each with a side salad....

Butternut Squash Chicken Spaghetti (Squash version)


Butternut Squash Chicken Spaghetti (Pasta version)


Do yourself a favor, make it this week!
Related Posts Plugin for WordPress, Blogger...

Print Friendly