Thursday, March 22, 2012

Spring Cooking Grocery List


Did you know that March is National Nutrition Month? Now that we are nearly through the month, I happened to learn that this week.

I plan special events and work with donor membership groups at a large pediatric hospital here in Dallas. One part of my job is working with one of these membership groups, The Children's Trust, filled with over 500 individuals, predominately moms and dads with young kids. Each year they have an Education Event but this year we got to change it up - instead of a luncheon or evening reception with a clinical physician and hot topic, we are involving their kiddos for a family event, what I call Healthy Choices, Healthy Family. We will have a clinical nutritionist, along with two fabulous executive chefs that will join us and walk through everything from cooking demonstrations, gluten-free diets to how to involve your kids in the grocery planning/shopping so that they are excited about the food. The more interaction they have with it, the more comfortable they become trying it.

The event is this Sunday, and conveniently falls during this celebrated month of nutrition! In my preparation for it, I've been reading through several helpful handouts, including a list of fresh produce by season. I decided since that pertains to everyone, I would share it with you as we move into April and fresh Spring produce.

Fresh Produce Grocery List for the Spring:
  • Apples
  • Asparagus
  • Artichokes
  • Arugula
  • Avocados
  • Bananas
  • Bell Peppers
  • Broccoli
  • Carrots
  • Green Onions
  • Green Peas
  • Lettuce
  • Pears
  • Pineapple
  • Spinach
  • Strawberries 
  • Sweet Onions
  • Valencia Oranges
So whatcha waiting for? Go shop and enjoy the fresh seasonal tastes!

    Wednesday, March 21, 2012

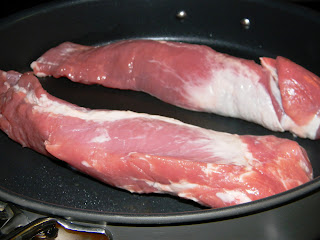
    Spring Forward: Pomegranate-Chipotle Pork Tenderloin


    Daylight savings has come, Easter is right around the corner, spring is here! I decided to ring in the season with some spring cooking this week using some fruity tastes. I found this recipe on pinterest and modified it a bit to try to make it a little lighter, like cutting back on the brown sugar and molasses used in the sauce. My brother, Michael, decided to join Mr. Max and I for dinner so with the need to feed two growing men and a lady, while providing some lunchable leftovers, I made two pork tenderloins tonight which would feed 6. If you need to downsize and eliminate one, I would still encourage you use the same measurements for the sauce. Though it will make more than you need, the recipe said it keeps for up to three weeks in the fridge and it would go great on fish or chicken too!

    Click here for the nutritional facts for this recipe. Serving size is 3 slices of pork and 2 tbsp. of pomegranate-chipotle glaze.

    Grocery List:
    • 3 cloves garlic, minced
    • 2 tsp. Adobo sauce from Chipotle Peppers in Adobo (If you are brave, mince one pepper and include it in the sauce - alas, I was not as brave)
    • 2 tbsp. tomato paste 
    • 1 tbsp. molasses 
    • 1 tbsp. brown sugar
    • 1/2 tsp. dried mustard
    • 1 cup pomegranate juice 
    • 1 tbsp. lemon juice 
    • 1 or 2 pork tenderloins
    • 2 tbsp. olive oil 
    Pre-heat the oven to 425 degrees. Combine the first 7 ingredients in a bowl and whisk together until well combined.
     

    Pour into a sauce pan and simmer over medium heat until sauce reduces and thickens. Remove from heat and stir in the lemon juice.


    In a large skillet, pour the olive oil and heat on medium-high heat. Sear the tenderloin(s) on all four sides for about 1 minute each until slightly browned.


    Place the tenderloin(s) on a greased, foiled baking sheet. Brush with the glaze and place in the oven for 10 minutes.


    Remove, flip the tenderloin and brush with glaze again. Roast for another 8-10 minutes.


    Test the meat using the rule of thumb and wait about 3-5 minutes before you slice into it. This allows the natural juices created from the heat to permeate and settle into the meat, keeping it tender throughout, rather than escaping and drying out when cut into. Now, slice...


    Top with remaining glaze and serve it up!
     
    Served with cauliflower mashed potatoes and sauteed vegetables

    Tastefully yours,

    Parmesan-Pine Nut Broccoli


    Roasted broccoli has become my go-to veggie for dinner and left-over lunches. It is so simple to throw it in the oven with some olive oil, sprinkled in your seasoning of choice, a little parm and maybe a second veggie like carrots, bell peppers, or squash. I've become so dependent on this side, I recognized a need for some change. I decided to shake it up a little when I saw this in America's Test Kitchen Light and Healthy magazine. Instead of roasting, this just entailed a skillet. Rather than oil, there was vegetable stock involved. I hit familiar territory seasoning with some garlic, use my trusty Parmigiano-Reggiano, but then add some toasted pine nuts to the final product giving it a new taste-dimension and crunch.

    Mr. Max and I thoroughly enjoyed this delicious and nutritious dish, I will now have to split time between my roasted favorites and this skillet version. Click here for the recipe nutritional facts per serving calculated by SparkRecipes.com. Serving size is equal to 3/4 cup.

    Grocery List:
    • 2 cups broccoli florets
    • 1/2 cup vegetable stock (can use chicken stock too)
    • 1/4 cup Parmigiano-Reggiano, grated
    • 1/4 cup pine nuts
    • 1 tsp. olive oil
    • Garlic powder to taste
    In a large skillet, add your broccoli and the stock then season to your heart's content with the garlic powder. Set the heat to medium-high then let cook for about 8 minutes, covered.
     

    As the broccoli cooks, we will toast our pine nuts in a smaller skillet using just a little olive oil. Set the heat to medium (4-5 on the dial) and pay close attention so that they don't burn. The smell of them toasting always reminds me a bit of popcorn! This should take about 3-4 minutes.

    After about 8 minutes, check on your broccoli. If you can easily pierce with a fork, go ahead and remove from heat. If there is still some liquid in the pan that the broccoli did not soak in, use a colander to drain before moving to a bowl. Once in a bowl, add the Parm and the pine nuts to toss. 

    When tossed to your perfection, dish it out to a plate and enjoy!

    Tastefully yours,

    Thursday, March 15, 2012

    Miso-Orange Glazed Fish


    Flipping through yet another cashier line, impulse-purchase magazine, I came across a recipe for a glazed fish. The featured recipe was a soy-mustard glaze, one that Mr. Max was very interested in. On the bottom right side of the page there was an adaption for another sauce, this miso-orange glaze, the one that I was tempted by.

    I have marked several recipes with miso as the star ingredient, but when it comes down to it, I always choose something else over. It was time to break out of the usual and try something new, not just another adaptation of a taste I know and like, one that I am comfortable with. Looking at the recipe, I had that oh-la-la feeling of a challenge coming on. But why? Simply because I wouldn't have said: hey, I think I'm going to combine whole grain mustard (that I don't even like by itself), some orange juice and zest, miso paste and brown sugar, then lather it on some fish tonight. But that's the beauty of this my foodie friends! And the reason I impulse purchase these test kitchen magazines in the check out line.

    It's dishes such as this that made me fall in love with this little hobby in the first place: taking a various assortment of ingredients, combining and creating something delicious. And don't we all love to fall in love over and over again?

    This recipe was taken from the America's Test Kitchen Light and Healthy 2012 magazine. Not only was it quick and easy, it was also delicious and nutritious with 330 calories, 12g fat, 15g carbs, 35g protein, 880mg sodium.

    Grocery List:
    For fish
    • Two 4-6 oz. fish fillets (I used salmon but this would be great on halibut or another white fish)
    • 1 tsp. light brown sugar
    • 1 tsp. canola oil
    • Salt and pepper to taste
    For Orange-Miso Glaze
    • 1 tsp. grated orange zest
    • 1/4 cup orange juice
    • 2 tbsp. white miso paste
    • 1 tbsp. light brown sugar, packed
    • 1 tbsp. rice vinegar
    • 1 tbsp. whole-grain mustard
    • 3/4 tsp. cornstarch 
    • pinch of cayenne
    Start by pre-heating your oven to 300 degrees and adjust the oven rack to the middle position. Combine the glaze ingredients in a bowl. Whisk together until well combined.


    Transfer to a small saucepan and bring to a boil over medium-heat. Let simmer, whisking often until thickened (about 5 minutes). Remove from heat and cover to keep warm.

    Sprinkle the brown sugar over top each fish fillet, season with salt and pepper to taste. Heat oil in a skillet over medium-high heat to sear the fish. Place fillet flesh side down and for about 1 minute.
     

    Flip the fish and sear the skin side for about 1 minute.
     

    Place your fish in an oven safe baking dish. I like to use aluminum foil to assist in not only the cooking process, but the cleaning process as well! Brush the glaze evenly over the fillets then place in the oven.
     

    Cook for ten minutes or until fish looks and feels done. Transfer the fish to a dish and dinner is ready!
     Served with a parmesan-pine nut broccoli (recipe coming soon!)
    Tastefully yours,

    Wednesday, March 7, 2012

    Mexi-Texi Chicken Wraps


    Mr. Max spontaneously decided we would head to Milwaukee for the weekend to surprise his dad for his birthday and visit family. I packed my warmest stuff to experience my first Midwest winter! Of course we travel on the day that horrible storms are ripping through from Texas to Wisconsin - all other flights around us were cancelled. The two minutes it would have taken to grab the Dramamine would have been worth it....

    After circling for nearly an hour and experiencing a landing process that I honestly didn't think we would walk away from, we gave the captain a round of applause for keeping us all alive and the flight attendant welcomed us to Chicago O'Hare. A nice two second pause allowed the plane to fill with gasps, Mr. Max and my faces to drop, and her to say just kidding. Well played lady, well played.

    We had such a fun weekend spending time with his family and playing with his nearly 6-month old nephew!
     
    Me and little man

     
    Max and the little squirmer

    On Saturday, Mr. Max and I decided to make use of all the snow - Meet Sam the Snowman! That's a red light bulb for his nose, we didn't have a carrot.

    As all good things do, the weekend had to come to an end. When we got home, we were in need of a quick fix for dinner. So we made some smoothies to hold us over and threw some chicken in a crock pot to make some shredded chicken wraps with the spinach lavash bread I got while in Austin. Lavash is a low-carb, flat bread that originated in the Middle East.

    Click here for the nutritional facts for my Mexi-Texi wraps, calculated at SparkRecipes.com. Serving size is 1 wrap, with 3 decent spoonfuls of filling and 1 tbsp. worth of avocado-chiptotle spread.

    Grocery List:
    • 1/2 can black beans, drained and rinsed
    • 1/2 cup frozen sweet corn, thawed
    • 2 chicken breasts
    • 1 red, yellow and orange bell pepper, diced 
    • Cumin to taste
    • 2 tbsp. lime juice, divided
    • 1 avocado, sliced thin
    • 1 tbsp. sauce from canned chipotle peppers in adobo sauce
    • Lavash bread, or tortillas
    • a pinch of Monterrey-Jack cheese
    In a crock pot, add your diced bell peppers and the chicken breasts. Set on high and walk away for about an hour. 
     

    We were a little more impatient than normal, so while I would have liked these to cook longer, I did start to tear into them after 1 hour in the crock pot, shredding with 2 forks. They would have been more shred-able with more time, but it still worked out!
     

    In a skillet, add your black beans and corn, 1 tbsp. of lime juice and and heart shake of cumin. Sit on medium heat for about 5 minutes to mix with the cumin and lime.
     

    Add the black beans and corn to the shredded chicken and bell peppers in the crock pot, along with the additional tbsp. of lime juice and a few more shakes of cumin. Turn on a low setting.
     

    In a food processor, add 3/4 of your thinly sliced avocado and the sauce from a can of chipotle peppers in adobo. Blend until smooth and creamy.
     

    Starting about 1 inch in from each edge, spread 1 tbsp. worth of the avocado-chipotle sauce on the lavash bread, top with a few hearty spoonfuls from the crock pot.


    Top with a low fat cheese and use that additional 1/4 of the sliced avocado (should be a few slices left) and add some to your wrap. Fold tightly and cut off the extra breaded area for angled edges. Toast in a skillet over high heat for 2 minutes each side to firm the lavash.

    Remove from heat, put on a plate and dig in! I did not add any lettuce in because of the large dose of greens in my smoothie, but feel free to add some chopped lettuce.
     
     Served with a Mexican rice pilaf

    Tastefully yours,
     

    Monday, March 5, 2012

    Smooth(ie) Operator: The Elphaba


    The smoothie. It's kinda like the crock pot meal where you put a bunch of stuff in a contraption and press a button to take care of the rest.

    I happened to have a conversation recently with a friend who made me think about these drinks. She said that she goes to Jamba Juice all the time because she doesn't know how to make them herself and have them taste as good (that's important!), needing inspiration to make her want to blend her own. I can completely relate to that and was the same way until I bought a blender because I felt I needed one, but then never used it because I didn't know what I wanted to make with it. It's like that fabulous pair of red shoes you bought for that one dress. They just sit there, you want to be able to use them, so you find whatever you can (appropriately) pair them with to get more use out of them. Then, before you know it, you have found all kinds of outfits to wear with and love them to pieces! So there, blenders are just like shoes.

    I had always been a berry-smoothie person, but in the last few months, I've encountered a switch. I have now replaced the berries with banana, my usual kale with spinach, and the juice with almond milk. The conversation with said friend above made me decide to post, just in case someone else out there is searching for a quick smoothie that appeals to you. This type of recipe goes by many names: Green Monster, Green Machine, Green Goddess, ... I think you get the picture! I'm going to call this the Elphaba, if you understand that reference, we can be best friends.

    Now a personal disclaimer, intended for those with aversions to drinking green stuff: I used to have an issue with the green color, which is why I would use the Kale and mixed-berries combo, it gave me the nutrients but kept it looking purple and berry-licious. However, I was growing kinda tired of berries, getting the seeds in my teeth, and needed to switch up my taste to keep my palate interested. After a sampling at Whole Foods, I really liked a PB/Banana/Vanilla combo, but those are all light colors, does not disguise the green. The spinach does have a more mild taste than the kale, so that part was actually better. I remembered I used to drink Green Tea Frappucinos all the time, obviously, those are green. So I Jedi-mind-tricked myself and now don't think twice regarding the color, enjoying every last drop.

    Click here for my nutritional facts calculated at SparkRecipes.com. Makes enough for one 24 oz. or two 12 oz. smoothies, facts are for one 12 oz. serving.

    Grocery List:
    • 1 cup frozen bananas, pre-chopped
    • 2 cups baby spinach leaves
    • 1 cup vanilla almond milk (unsweetened)
    • 1/2 cup Greek vanilla yogurt
    • 1 tbsp. peanut butter
    Pile your contents in the blender. I go: fruit, liquid, greens, yogurt, peanut butter. I've also used Nutella instead of peanut butter, but you get much more dimension with 1 tbsp. PB, than with 1 tbsp. Nutella.

      Make sure is all locked in place and hit the liquify/blend/puree button... whatever strikes your fancy. Depending on the state of your blender, you may need to jiggle it a few times, stop it to push the contents down, things of this nature... blend until you reach a perfectly smooth consistency.

      Pour into a cup and you have a perfect breakfast, lunch, or post-workout snack!

      Tastefully yours,


        Related Posts Plugin for WordPress, Blogger...

        Print Friendly