Wednesday, August 31, 2011

Hatch Chile Stew


It is not a secret that Whole Foods is my favorite grocery store.The reason for this because of their fresh, wonderful selections and let's be honest, the proximity to my current residence. However, my world will be rocked in a month when I get to go through a move across town and I head back to my old 'hood from four years ago. At that time, Central Market will be my closest store and I will not hesitate to say, probably my new preference. Contrary to what some of my recipe posts may convey, I do like easy, people. Additionally, Central Market does have a one-up on Whole Foods because they offer cooking classes with some impressive product mention that is rather enticing AND they are advocates of the "sample while you shop" method. I am a fan of this, which leads into how we came across this gem of a meal.

To help acclimate myself again to my former and soon-to-be new stomping grounds, okay and maybe for the 4th course coupon for Dallas' Restaurant Week with purchase of $25, I decided to do my Sunday grocery shopping there a few weeks back. As I meandered through the maze that is the store, I sampled all kinds of treats. In the meat section, they had a Hatch Chile Stew with pulled pork at the demonstration station. I had two plastic cup helpings (you know, sometimes you taste the mini-spoon amount and think, I need to try it again, just to make sure that I loved that as much as I think I do). I then gave some to Mr. Max for his approval and the next thing I know, he had the jar and was adding it to the cart. Meet the star of this post.

For those looking for a nice and simple dinner, this is your winner

Yum. Thank you Will, Brian and Kyle.

Grocery List:
  • 3/4 jar of jarred Green Chile Stew
  • 1 lb. lean ground pork or turkey
  • 3 medium sized Yukon gold potatoes
  • 1/2 cup white corn

Preparing the potatoes is the most time consuming part and that is not saying much. Start by peeling and then chopping the potatoes down to small chunks. Now class, why do we prefer the smooth, white Yukon potatoes to rough, brown Russet potatoes?? Because they contain less starch! Once chopped, boil in a pot until they can be easily pierced by a fork, but do not over cook, you do not want mushy taters.

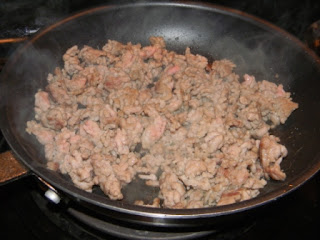
Next, add a dash of olive oil to the skillet to brown and cook your meat for about 10 minutes on medium-high heat.


Unpaid product placement: I highly recommend investing in this pasta scoop by Giada DiLaurentiis. It was apart of a cooking utensil birthday package that my brothers gave me. This really comes in handy! Once potatoes are ready, scoop and strain..........

 .........into a crock pot with the meat.

Add the jarred green chile mix and the corn into the crock pot on a high heat setting, stir together. 

To serve, spoon your stew into bowls, garnish with a nice shredded Monterrey Jack cheese and cilantro!

Monday, August 29, 2011

Remix: Hatch Chile and Chicken Enchiladas


Tis the season for hatch chile peppers! Last summer to observe this, we went to Amy's lake house and made these tasty enchiladas, replacing the poblano in the original recipe with the hatch peppers along with a few other adaptations. Now here we are again, one year later, putting our hands together to recreate this delicious dish. We had Meredith on the Guacamole, Amy on the Black Bean and Corn Salsa, and Greer chopping everything possible as she sat still due to a recent knee injury. In the back ground we had ABC's Bachelor Pad and Bravo's Most Eligible: Dallas to fulfill our quota of laughable, ridiculous, mind-numbing reality TV "entertainment" for the evening. We re-vamped the original recipe just a bit and will re-post some highlights for you here.

Grab a glass, pour some SkinnyGirl Margarita or Sangria and let's get started!! For the full recipe, click here, this post is just a recap. 
 Mixing the chicken and the spices

 Beginning phases of the sour cream and hatch chile sauce

 Greer chopping but taking a quick guacamole break

 Adding 1 cup of the sauce to chicken mix (original recipe said 3/4, we went big tonight)

 Enchiladas, rolled and ready: Snug as a bug in a rug.

 Topped with hatch chile sauce...

 And now the cheese...

Sprinkled with cilantro and scallions, baked until golden and bubbly!

A Thank You and Four Cheese Baked Penne Repost

I want to take a moment to pay my thanks and appreciation to my community of support - this has grown beyond what I could have ever imagined! I've been out of town since Thursday and when I returned late last night, I learned that Carol Toler with the Lake Highlands Advocate had done a write-up about this blog contest, my church is circulating emails to vote, my blog traffic stats are rockin off the charts and this little "hobby" of mine needs to pick it up because requests for new posts are coming in. THANK YOU seems like an incredible understatement. Regardless of the outcome, my heart is touched and I'm sitting here like a goof crying at my desk because it means so much to me. I appreciate you, your votes and your kindness, please keep voting through September 9!

Because I have been consumed with traveling, meetings and events lately, I don't have new material right now to post. However, I wanted to give new readers some past recipes as you begin your week and may want some (easy) dinner ideas.

As Carol wrote, I used to make a ton of pasta dishes in college. I refer to this time as my "getting the feet wet" stages of cooking. My baked ziti approach has evolved and I wanted to share our favorite recipe adapted from Elie Krieger in the link below. Enjoy this delicious dish and watch for an upcoming remake post of the Hatch Chili Chicken Enchiladas from the lake last summer as the gnocchi girls and I make them again tonight! Have you voted today?

Have yourself some Italian tonight - http://kitchenwithkate.blogspot.com/2010/11/four-cheese-baked-penne.html

Tuesday, August 23, 2011

Watermelon Margaritas


My first beverage post, ta-da! (and cue a southern curtsy)

For our August supper club, our little "family" chose to make a fajita feast at Betsy's new house for our August get-together. We always look forward to the time to talk, celebrate, laugh and cook together each month. I would like to take a quick side note to tell you of my recent phenomenal discovery during this family dinner... let me start by asking, have you seen The Help yet? There's a part where Skeeter is asking Abilene about the letters for her Miss Myrna column. The question is, "how do I keep my eyes from tearing up when I cut onions," Abilene responds, "put a match stick between your lips." So, as we were all in the kitchen cooking our fajita feast, I decided to try this as I went to town on a huge, juicy onion and... IT WORKED! No tears or the slightest sting to my eyeballs, all because a little wooden, unlit match sticking out of my mouth. So there you go, tried and true advice from me to you, compliments of The Help.

Now, back to this margarita. I recently picked up the new issue of Cooking Light's Super, Fresh and Simple Meals. While perusing, I couldn't help my intrigue of the tasty libations featured, including this delicious little Watermelon Margarita. This frothy treat is 105 calories and it was a hit! Additional nutritional facts include 0.2g fat, 0.6g protein, 14.1g carbs, 7mg calcium per glass.

Grocery List:
  • 3 1/2 cups cubed, seeded watermelon
  • 1/2 cup tequila
  • 2 tbsp. sugar
  • 3 tbsp. fresh lime juice
  • 1 tbsp. Triple Sec
  • 3 cups crushed ice
Ready for how easy this is? Combine all of your ingredients in a blender and process until ice is nicely crushed into a smooth consistency. Fill a glass, garnish with a lime and you have yourself a delicious watermelon margarita!

Monday, August 22, 2011

Herb and Goat Cheese Stuffed Chicken

Thumbing through my new Cooking Light Super Fresh and Simple Meals magazine, I came across this stuffed chicken recipe. For those that have been with me for a while, the beginnings of this blog shared a lot of stuffed chicken recipes, with our favorite as another goat cheese chicken. This Sunday night I decided to two-time that recipe and try this other goat cheese chicken instead and loved the mint/parsley combination.

Nutritional facts include 346 calories, 12.9g fat, 46.8g protein, 10.7g carbs, 3.7g fiber, 4.2mg iron, 114mg calcium per serving.

Grocery List:
  • 1/4 cup Panko breadcrumbs
  • 2 tbsp. chopped fresh mint
  • 2 tbsp. chopped fresh parsley
  • 1 (4 oz.) package goat cheese
  • 4 skinless, boneless chicken breast halves
  • 1 tbsp. olive oil

Start by combining the panko, mint, parsley and goat cheese in a bowl; stir well.

Targeting the thickest part of the chicken breast, and using a paring knife or a smaller blade for agility, make a horizontal cut and create a pocket about 2 inches deep and 3-4 inches wide (if you can, do what your chicken will allow you to do) - then stuff it with your goat cheese mixture!

Close and secure your stuffed chicken with toothpicks.

Add olive oil to a skillet and place your chicken breasts in the pan on medium-high heat. Let brown on one side for about 5-7 minutes. Go ahead and heat your oven to 475 degrees.

Place your chicken on a cookie sheet, make sure you use a non-stick cooking spray. Place in the oven for about 15 minutes until chicken is cooked through. 

To serve, cut the chicken to see the beautiful layer of goat cheese and herbs and enjoy! Don't forget to take out the toothpicks :-)
Served with garlic wilted spinach and red bell pepper couscous

Wednesday, August 17, 2011

DFW Most Valuable Blogger


I interrupt the food posts to bring you a plea for a favor. I awoke this morning to an email saying that I had been nominated and chosen as a candidate for the DFW Most Valuable Blogger in the Dining and Entertainment category by CBS. I am not sure that my little food blog completely fits this category but I am very humbled and honored to be considered, especially with such great company.

So here is my plea for subscribers, followers and secret followers: Let's get some votes and try to win this thing all in the name of FOOD and recipe lovers everywhere! You can click on the widget above (and on the side of the blog when I can figure out how to imbed it) to vote for Kate's Cure for the Common Cuisine once a day, until September 9. That's right, you can vote every day!

Thank you so much for your support and interest in my posts. I have slacked a little this summer but this has lit a fire in me to keep inspiration coming for new recipes to share.

Let the voting begin - I appreciate your time and support!

Make a Meal: Chimichurri Salmon with Black Bean-Corn Succotash


The first weekend in August, Mr. Max and I decided to head to New Orleans for the weekend. For a self-proclaimed food lover, this was a wonderful and delicious adventure! We ate a little too well all weekend, trying to take in the tastes and culture, with the many Creole/Cajun and French influences. This meal is a dish I saw on the menu of Emeril's NOLA restaurant but didn't get to try, so I thought I could bring the idea home to recreate it myself and see how that worked out. Friends, it worked out real nice...

Before I had time to create this post, a coworker and I were swapping dinner/recipe stories and asked me to send her the recipe because she wanted to make this. I told her I didn't have time to post yet but would let her know when ready. Though, as we kept chatting, I realized just how easy this was to make and was able to spout it out from memory. One of the best lessons I've learned is to not let a recipe fool you - it may sound difficult but it is really so very easy. Letting the salmon bake was the longest part of the process and something I should have put in first so by the time it was done, the rest of the food would be too!

Grocery List:
For Salmon
  • Olive oil
  • Salt and pepper to taste
  • 2 fresh Atlantic salmon fillets
For Chimichurri
  • 6 cloves garlic
  • 1 big handful of parsley
  • 1/4 cup red onions, diced
  • 1/4 + 1 tbsp. olive oil
  • 2 tbsp. red wine vinegar
  • 1 tbsp. lime juice
  • Red pepper flakes to taste (optional)
For Succotash
  • 2 cloves garlic, chopped
  • 1 tbsp. olive oil
  • 1/2 cup frozen sweet corn
  • 1/2 can black beans, drained and rinsed
  • 1/2 cup tomatoes, chopped
  • 2 tbsp. hatch chile pepper, diced
  • 2 tbsp. cilantro, chopped
  • Juice from 1/2 lime
Preheat your oven to 425 degrees and go ahead and brush your salmon with olive oil, season with salt and pepper.

Now we start on the chimichurri... combine the garlic, parsley and onion in the food processor and grind until well blended like below.

Remove from food processor and into a mixing bowl and stir in the olive oil, red wine vinegar and the lime juice. Add red pepper flakes if you want a bit of a kick, it really helps to provide some depth to the flavor! Place this bowl in the fridge until ready to serve over the salmon.
At this time, put your salmon in the oven and set the timer for 15 minutes. My apartment oven is becoming more and more difficult, so I ended up cooking mine closer to 20 minutes but you start at 15 and go from there.

When the salmon starts in the oven, you start your succotash. What is succotash? Well, I had to look this up because I really didn't have a clue and found that it is a dish containing corn and some kind of shelled bean, other ingredients may include peppers and tomatoes. Ok, that really sums it up perfectly, as evidenced by the grocery list. Here's another sidenote fun fact: remember Sylvester the Cat with the spitting lisp from Warner Brother's Looney Tunes? One of his catch phrases was "suffering succotash" as he spit all over the place. Don't imitate when cooking, or ever please, just know that random factoid. Back to succotash.... take your olive oil and heat in a skillet, then add the garlic over medium heat for about 3 minutes. Add in the corn and let cook for 5 minutes, followed by the black beans and tomatoes.

Add the hatch peppers followed by the finishing touches, the cilantro and lime juice, right before serving. The reason you want to wait on the last two are because all the other ingredients can sit on the stove for a while but the cilantro is the last important garnish and we don't want the lime juice to evaporate sitting on the stove for more than a few minutes.

When the salmon is ready, spoon the chimichurri sauce over top and place over a bed of the succotash. Mr. Max gave me an emphatic "wow" at first bite - I'll take that as an approval!

Sunday, August 14, 2011

Shrimp-Stuffed Avocado Salad


Max Man and I have a favorite breakfast spot called Buzz Brews. I tend to always get the same thing because it is just so good. I don't bother looking over the menu, just simply order the Hare Krishna which consists of breakfast crepes with jack cheese, big slices of avocados, tomatoes and poblano cream sauce, with honey wheat toast. On this particular breakfast day, we sat there, caveman-talking our food (the mmm-mm-mmms) and Mr. Max suddenly said, "I really love avocados," after a quick grab off my plate - cute. The whole point of that story was to say, I found this recipe in my Cuisine Lite Grilled magazine and decided to give the boy what he wants. Avocados. And of course, getting to try something fun that I knew I would enjoy as well!

Taken from Cuisine Tonight Grilled magazine, this light and refreshing summer dinner comes it at 376 calories, 28g total fat, 134mg cholesterol, 15g carbs, 7g fiber and 20g protein per serving.

Grocery List:
  • 3 tbsp. olive oil, divided
  • 1 tbsp. chopped fresh parsley
  • Juice of 1 lime, divided
  • 1/2 tsp. garlic powder
  • 1/2 tsp. red pepper flakes
  • 1/2 - 3/4 lb. shrimp, peeled and deveined, tails removed
  • 1 avocado, halved and pitted
  • 1/3 cup  halved grape tomatoes
  • 1/2 cup sweet corn, grilled
  • Mixed greens
For citrus aioli dressing
  • 1/4 cup light mayonnaise
  • 4 tsp. fresh orange juice
  • 2 tsp. minced garlic
  • 1 tsp. orange zest
  • 1 tsp. lime zest
  • 1/4 tsp. cayenne pepper (or to taste)
Pre-heat your grilling surface to medium heat. Combine the mayo, OJ, garlic, zests, and cayenne for the aioli in a  small bowl and mix well. If you have a food processor, I would recommend blending it up for a creamier consistency. Refrigerate. (I did not think to use a food processor until after the fact, I personally recommend to eliminate any clumpies, which happens with mayo)

Mix 2 tbsp. oil with parsley, 1 tbsp. lime juice, garlic powder and pepper flakes in a bowl; add the shrimp and toss to coat.

Brush the halved avocados with remaining 1 tbsp. oil and juice of 1/2 lime.

Grill the shrimp, avocados and corn uncovered until shrimp are pink and curled - about 5 minutes.

Grill the avocados until grill marks appear, like so:

Now make a shallow scoop, by removing about two-thirds of the avocado, leaving bottom third in the "shell".

Dice up the shrimp, avocados and tomatoes to make smaller chunks. Gently stir the contents together in a small bowl and spoon back into the avocado "shells". Set over top a bed of mixed greens, sprinkle with corn, and any left over tomatoes, shrimp or avocado, then lightly drizzle some aioli over each serving.

Tuesday, August 9, 2011

Peach-Melba Pork Chops


I've decided that I simply adore summer cooking. It is the best time of the year to use fresh fruits and vegetables, everything is bright and colorful. This dinner was rather quick and easy to make, additionally we loved the sweet melba glaze with the pork chops.

The mistake I commonly make with pork is my preparation - you really shouldn't cut corners with it if you want to get the most out of that type of meat, as thick and tough as it can naturally be. When we were in Austin last month, we went to a restaurant that served a thick bone in cut of pork, but it was as tender as a fillet mignon. They told me they had a three-step cooking process, so I decided to adapt my own. While I didn't quite have a 3-step need (sear, smoke, grill), I decided that I would pan-sear to help lock in the juicy tenderness of the interior, and then take it to the grill.

This one comes from Cuisine Lite Grilled and the nutritional facts are just a little higher on this one with 426 calories, 10g fat, 56mg chol, 44mg sodium, 9g carbs and 53g protein.

Grocery List:
  • 3 - 4 bone in pork chops (4 - 6 oz each)
  • Salt and pepper
  • 1 tbsp. olive oil
  • 1/2 cup peach preserves
  • 1 tbsp. rice vinegar
  • 1 tsp. Dijon mustard
  • 1/4 cup fresh raspberries
We are going to start with the searing process, so grab a skillet and begin to heat it on medium-high. You want to season it with salt and pepper, then using the olive oil, throw that chop on medium-high heat for a quick sear on both sides - about 1 minute, 3 minutes if thicker than 1/2 an inch.

Cover with cooking spray and heat your grilling surface when ready. When you've completed your searing process, place your chops on a plate and set aside - I like to set them in my microwave to help contain the heat, but you can also tent foil and place it over top.

On medium heat, in the same pan, add your rice vinegar, peach preserves, Dijon mustard, and scrape any of the extra oils or browned bits from the searing.

Whisk together well, and allow the preserves to melt a bit.

When ready, place your seared chops on the grilling surface and let cook for about 5 minutes per side.

If they come up off the grill when slightly pulled on, they are ready to flip - if not, leave on a little longer but check back frequently. Thank you Central Market Grilling Basics class for that tip...

The recipe said to add the raspberries last and to keep off the heat - however, here's a secret. I love the TASTE of berries, I like them ground up or frozen, but I hate them in their natural form. It's a texture thing for me. I decided to throw the raspberries in, while the heat was on, to let them melt into the peach sauce. It was a good choice, if I do say so myself. Stir together to mix well, then take off heat about 5 minutes before ready to serve.

When your pork is perfect, spoon the Peach-Melba glaze over top and enjoy!
Served with lemon-parsley roasted asparagus and mashed potatoes
Related Posts Plugin for WordPress, Blogger...

Print Friendly